2016年3月31日 星期四

封包產生器 - pktgen

1. pktgen是一個Linux核心中的一個模組,可以用來產生大量封包,測量設備的網路效能,相較於User space的iperf,pktgen是一個更精準的測試工具。

2. 參數說明
Pgcontrol commands
    start Starts sending on all threads
    stop

Threads commands
    add_device: Add a device to thread i.e eth0
    rem_device_all: Removes all devices from this thread
    max_before_softirq: do_softirq() after sending a number of packets

Device commands
    debug
    clone_skb: Number of identical copies of the same packet 0 means alloc for each skb. For DoS etc we must alloc new skb’s.
    clear_counters: normally handled automatically
    pkt_size: Link packet size minus CRC (4)
    min_pkt_size: Range pkt_size setting If < max_pkt_size, then cycle through the port range.
    max_pkt_size
    frags: Number of fragments for a packet
    count: Number of packets to send. Use zero for continious sending
    delay: Artificial gap inserted between packets in nanoseconds
    dst: IP destination address i.e 10.0.0.1
    dst_min: Same as dst If < dst_max, then cycle through the port range.
    dst_max: Maximum destination IP. i.e 10.0.0..1
    src_min: Minimum (or only) source IP. i.e. 10.0.0.254 If < src_max, then cycle through the port range.
    src_max: Maximum source IP.
    dst6: IPV6 destination address i.e fec0::1
    src6: IPV6 source address i.e fec0::2
    dstmac: MAC destination adress 00:00:00:00:00:00
    srcmac: MAC source adress. If omitted it’s automatically taken from source device
    src_mac_count: Number of MACs we’ll range through. Minimum’ MAC is what you set with srcmac.
    dst_mac_count: Number of MACs we’ll range through. Minimum’ MAC is what you set with dstmac.

Flags
    IPSRC_RND IP Source is random (between min/max),
    IPDST_RND Etc
    TXSIZE_RND
    UDPSRC_RND
    UDPDST_RND
    MACSRC_RND
    MACDST_RND
    udp_src_min UDP source port min, If < udp_src_max, then cycle through the port range.
    udp_src_max UDP source port max.
    udp_dst_min UDP destination port min, If < udp_dst_max, then cycle through the port range.
    udp_dst_max UDP destination port max.
    stop Aborts packet injection. Ctrl-C also aborts generator. Note: Use count 0 (forever) and stop the run with Ctrl-C when multiple devices are assigned to one pktgen thread. This avoids some devices finishing before others and
skewing the results. We are primarily interested in how many packets all devices can send at the same time, not absolute number of packets each NIC sent.
    flows Number of concurrent flows
    flowlen Length of a flow
3. 掛載pktgen模組,一般Linux都有內建
$ sudo modprobe pktgen
4. 掛載完後,pktgen是透過proc entry去設定與控制,
$ ls /proc/net/pktgen/
kpktgend_0  kpktgend_1  kpktgend_2  kpktgend_3  pgctrl
kpktgend_0, kpktgend_1, kpktgend_2, kpktgend_3: 表示你的硬體有幾個CPU核心,pktgen可以指定由哪個CPU來處理網路流量。
pgctrl: 主要是用來啟動網路流量
5. 將eth0網路介面,指定由CPU0來處理
$ sudo bash -c 'echo "add_device eth0" > /proc/net/pktgen/kpktgend_0'
6. 指定完後,會出現一個新的proc entry為eth0介面,此時可以透過cat命令,來取得eth0介面目前的設定
$ ls /proc/net/pktgen/
eth0  kpktgend_0  kpktgend_1  kpktgend_2  kpktgend_3  pgctrl


$ sudo cat /proc/net/pktgen/eth0
Params: count 1000  min_pkt_size: 0  max_pkt_size: 0
     frags: 0  delay: 0  clone_skb: 0  ifname: eth0
     flows: 0 flowlen: 0
     queue_map_min: 0  queue_map_max: 0
     dst_min:   dst_max:
        src_min:   src_max:
     src_mac: b8:27:eb:01:37:78 dst_mac: 00:00:00:00:00:00
     udp_src_min: 9  udp_src_max: 9  udp_dst_min: 9  udp_dst_max: 9
     src_mac_count: 0  dst_mac_count: 0
     Flags:
Current:
     pkts-sofar: 0  errors: 0
     started: 0us  stopped: 0us idle: 0us
     seq_num: 0  cur_dst_mac_offset: 0  cur_src_mac_offset: 0
     cur_saddr: 0.0.0.0  cur_daddr: 0.0.0.0
     cur_udp_dst: 0  cur_udp_src: 0
     cur_queue_map: 0
     flows: 0
Result: Idle
7. pkt_size: 設定網路封包的大小,一般為46 bytes ~ 1500 bytes
count: 設定網路封包的數量,當Count 設成 0,表示系統會不斷送出封包,直到按下 Ctrl+C 手動終止程式
$ sudo bash -c 'echo "count 10000" > /proc/net/pktgen/eth0'
$ sudo bash -c 'echo "pkt_size 1400" > /proc/net/pktgen/eth0'
8. 啟動網路流量
$ sudo bash -c 'echo "start" > /proc/net/pktgen/pgctrl'
9. 取得測試結果
$ sudo cat /proc/net/pktgen/eth0
Params: count 10000  min_pkt_size: 1400  max_pkt_size: 1400
     frags: 0  delay: 0  clone_skb: 0  ifname: eth0
     flows: 0 flowlen: 0
     queue_map_min: 0  queue_map_max: 0
     dst_min:   dst_max:
        src_min:   src_max:
     src_mac: b8:27:eb:01:37:78 dst_mac: 00:00:00:00:00:00
     udp_src_min: 9  udp_src_max: 9  udp_dst_min: 9  udp_dst_max: 9
     src_mac_count: 0  dst_mac_count: 0
     Flags:
Current:
     pkts-sofar: 10000  errors: 0
     started: 11124860059us  stopped: 11126011505us idle: 13620us
     seq_num: 10001  cur_dst_mac_offset: 0  cur_src_mac_offset: 0
     cur_saddr: 169.254.31.88  cur_daddr: 0.0.0.0
     cur_udp_dst: 9  cur_udp_src: 9
     cur_queue_map: 0
     flows: 0
Result: OK: 1151445(c1137825+d13620) usec, 10000 (1400byte,0frags)
  8684pps 97Mb/sec (97260800bps) errors: 0
10. 一般測試範例,產生10000個封包,大小為1400 bytes
$ sudo modprobe pktgen

$ sudo bash -c 'echo "add_device eth0" > /proc/net/pktgen/kpktgend_0'

$ sudo bash -c 'echo "count 10000" > /proc/net/pktgen/eth0'
$ sudo bash -c 'echo "pkt_size 1400" > /proc/net/pktgen/eth0'

$ sudo bash -c 'echo "start" > /proc/net/pktgen/pgctrl'

$ sudo cat /proc/net/pktgen/eth0
11. 壓力測試範例,產生大量封包,大小為1400 bytes
$ sudo modprobe pktgen
$ sudo bash -c 'echo "add_device eth0" > /proc/net/pktgen/kpktgend_0'

$ sudo bash -c 'echo "count 0" > /proc/net/pktgen/eth0'
$ sudo bash -c 'echo "pkt_size 1400" > /proc/net/pktgen/eth0'

$ sudo bash -c 'echo "start" > /proc/net/pktgen/pgctrl'

$ sudo cat /proc/net/pktgen/eth0
11. 一個Script的範例
#!/bin/sh

#modprobe pktgen

function pgset() {
    local result
    echo $1 > $PGDEV
    result=‘cat $PGDEV | fgrep "Result: OK:"‘
    if [ "$result" = "" ]; then
        cat $PGDEV | fgrep Result:
    fi
}

function pg() {
    echo inject > $PGDEV
    cat $PGDEV
}

# Config Start Here -------------------------------------
# thread config
# Each CPU has own thread. Two CPU exammple.
# We add eth1, eth2 respectively.
PGDEV=/proc/net/pktgen/kpktgend_0
echo "Removing all devices"
pgset "rem_device_all"
echo "Adding eth1"
pgset "add_device eth1"
echo "Setting max_before_softirq 10000"
pgset "max_before_softirq 10000"

# device config
# delay is inter packet gap. 0 means maximum speed.
CLONE_SKB="clone_skb 1000000"

# NIC adds 4 bytes CRC
PKT_SIZE="pkt_size 60"

# COUNT 0 means forever
#COUNT="count 0"
COUNT="count 10000000"
delay="delay 0"

PGDEV=/proc/net/pktgen/eth1
echo "Configuring $PGDEV"
pgset "$COUNT"
pgset "$CLONE_SKB"
pgset "$PKT_SIZE"
pgset "$delay"
pgset "dst 10.10.11.2"
pgset "dst_mac 00:04:23:08:91:dc"

# Time to run
PGDEV=/proc/net/pktgen/pgctrl
echo "Running... ctrl^C to stop"
pgset "start"
echo "Done"

# Result can be vieved in /proc/net/pktgen/eth1
4. 參考來源
https://www.kernel.org/doc/Documentation/networking/pktgen.txt
https://www.kernel.org/doc/ols/2005/ols2005v2-pages-19-32.pdf http://benjr.tw/93300

2016年3月29日 星期二

vim套件 - cscope

1. 安裝Cscope
$ sudo apt-get install cscope
2. 將cscope_maps.vim內容加入.vimrc
http://cscope.sourceforge.net/cscope_maps.vim

3. 產生ctags關聯檔
$ find . -name *."[ch]" > cscope.files
$ ctags -L cscope.files
$ cscope -Rbki cscope.files

-R            Recurse directories for files.
-b            Build the cross-reference only.
-k            Kernel Mode - don't use /usr/include for #include files.
-i namefile   Browse through files listed in namefile, instead of cscope.files
4. HOW TO USE WITH VI
一個範例: cs find s 

    "   's'   symbol: find all references to the token under cursor
    "   'g'   global: find global definition(s) of the token under cursor
    "   'c'   calls:  find all calls to the function name under cursor
    "   't'   text:   find all instances of the text under cursor
    "   'e'   egrep:  egrep search for the word under cursor
    "   'f'   file:   open the filename under cursor
    "   'i'   includes: find files that include the filename under cursor
    "   'd'   called: find functions that function under cursor calls
5. 參考來源
http://cscope.sourceforge.net/

vim套件 - ctags & taglist

1. 安裝ctags
$ sudo apt-get install exuberant-ctags
2. 下載taglist後,將plugin及doc複製到家目錄的.vim
$ unzip taglist_46.zip
$ mkdir /home/allen/.vim
$ mv /home/allen/Downloads/taglist_46/plugin/taglist.vim /home/allen/.vim/plugin
http://www.vim.org/scripts/script.php?script_id=273

3. 設定F9去啟動taglist功能.
$ vim .vimrc
map <F9> :Tlist<CR>
4. 產生ctags關聯檔
$ find . -name *."[ch]" > ctags.files
$ ctags -L ctags.files
5. HOW TO USE WITH VI
Vi will, by default, expect a tag file by the name "tags" in the current directory. Once the tag file is built, the following commands exercise the tag indexing feature:

vi −t tag    Start vi and position the cursor at the file and line where "tag" is defined.
:tags        Trace all tags
:ta tag      Find a tag.
Ctrl-]       Find the tag under the cursor.
Ctrl-T       Return to previous location before jump to tag (not widely implemented).
6. 參考來源
http://ctags.sourceforge.net/ctags.html

vim套件相關設定

1. 將相關設定加入.vimrc
set hlsearch
set mouse=n

execute pathogen#infect()

map <f2> :tabe<CR>
map <f3> :tabN<CR>
map <f4> :tabn<CR>

map <f5> :se list<CR>
map <f6> :se nolist<CR>
map <f7> :FufFile<CR>
map <f8> :BufExplorer<CR>

" Open and close all the three plugins on the same time
nmap <F9> :TrinityToggleAll<CR>

" Open and close the srcexpl.vim separately
nmap <F10> :TrinityToggleSourceExplorer<CR>

" Open and close the taglist.vim separately
"nmap <F11>  :TrinityToggleTagList<CR>
nmap <F11> :Tlist<CR>

" Open and close the NERD_tree.vim separately
nmap <F12> :TrinityToggleNERDTree<CR>
2. 將cscope_maps.vim內容加入.vimrc
http://cscope.sourceforge.net/cscope_maps.vim

3. 將需要的套件放到.vim下
$ tree -L 2
.
--- autoload
|   |__ pathogen.vim
--- bundle
    |__ bufexplorer-7.4.6
    |__ nerdtree
    |__ SrcExpl-5.3
    |__ taglist_46
    |__ Trinity
    |__ vim-fuzzyfinder
    |__ vim-l9
4. 產生ctags和cscope的關聯檔
$ find . -name *."[ch]" > cscope.files
$ ctags -L cscope.files
$ cscope -Rbki cscope.files

vim套件 - 搜尋檔案的套件 FuzzyFinder

1. FuzzyFinder : buffer/file/command/tag/etc explorer with fuzzy matching
http://www.vim.org/scripts/script.php?script_id=1984

2. 需要安裝L9 Library Requirements: ~ - L9 library (vimscript #3252)
http://www.vim.org/scripts/script.php?script_id=3252
You can launch FuzzyFinder by the following commands: 

         Command           Mode ~ 
        |:FufBuffer|       - Buffer mode (|fuf-buffer-mode|) 
        |:FufFile|         - File mode (|fuf-file-mode|) 
        |:FufCoverageFile| - Coverage-File mode (|fuf-coveragefile-mode|) 
        |:FufDir|          - Directory mode (|fuf-dir-mode|) 
        |:FufMruFile|      - MRU-File mode (|fuf-mrufile-mode|) 
        |:FufMruCmd|       - MRU-Command mode (|fuf-mrucmd-mode|) 
        |:FufBookmarkFile| - Bookmark-File mode (|fuf-bookmarkfile-mode|) 
        |:FufBookmarkDir|  - Bookmark-Dir mode (|fuf-bookmarkdir-mode|) 
        |:FufTag|          - Tag mode (|fuf-tag-mode|) 
        |:FufBufferTag|    - Buffer-Tag mode (|fuf-buffertag-mode|) 
        |:FufTaggedFile|   - Tagged-File mode (|fuf-taggedfile-mode|) 
        |:FufJumpList|     - Jump-List mode (|fuf-jumplist-mode|) 
        |:FufChangeList|   - Change-List mode (|fuf-changelist-mode|) 
        |:FufQuickfix|     - Quickfix mode (|fuf-quickfix-mode|) 
        |:FufLine|         - Line mode (|fuf-line-mode|) 
        |:FufHelp|         - Help mode (|fuf-help-mode|) 
3. 在.vimrc加入下面語法
map <f9> :FufFile<CR>

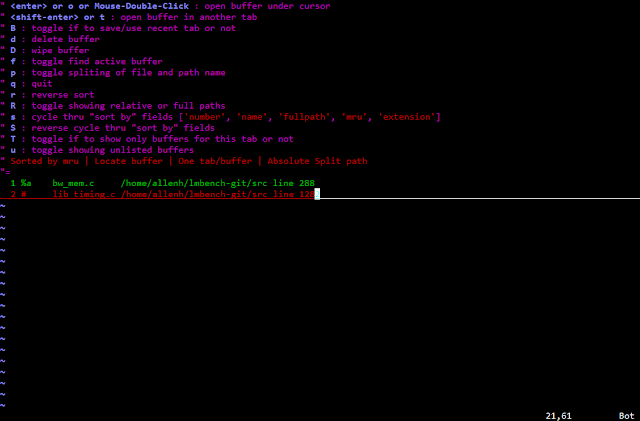
vim套件 - 管理buffer頁面 bufexplorer

1. bufexplorer.zip : Buffer Explorer / Browser
http://www.vim.org/scripts/script.php?script_id=42

Bufexplorer also offers various options including:
- Display the list of buffers in various sort orders including:
- Most Recently Used (MRU) which is the default
- Buffer number
- File name
- File extension
- Full file path name
- Delete buffer from list

2. 安裝流程
Simply unzip bufexplorer.zip into a directory in your 'runtimepath', usually ~/.vim or c:\vimfiles, and restart Vim. This zip file contains plugin\bufexplorer.vim, and doc\bufexplorer.txt. See ':help add-local-help' on how to add bufexplorer.txt to vim's help system.

3. 在.vimrc加入下面語法
map <F9> :BufExplorer<CR>
With bufexplorer, you can quickly and easily switch between buffers by using the one of the default public interfaces:

  '\be' (normal open)  or
  '\bs' (force horizontal split open)  or
  '\bv' (force vertical split open)

vim套件 - Linux界的Sourceinshgit Trinity

1. Trinity : the Trinity of taglist, NERDtree and SrcExpl: an IDE works like "Source Insight"
The Trinity plugin manages Source Explorer, Taglist and NERD Tree, and build them as a great IDE which works like the "Source Insignt".
http://www.vim.org/scripts/script.php?script_id=2347

安裝Trinity,必須結合以下三個套件
1\ Automatic Display of Declarations in the Context Window on the bottom in the (G)VIM window using the script named 'Source Explorer(srcexpl.vim)' :
http://www.vim.org/scripts/script.php?script_id=2179

2\ Symbol Windows For Each File on the left in the (G)VIM window (G)VIM using the script named 'taglist.vim':
http://www.vim.org/scripts/script.php?script_id=273

3\ Quick Access to All Files on the right in the (G)VIM window using the script named 'The NERD tree(NERD_tree.vim)':
http://www.vim.org/scripts/script.php?script_id=1658

2. 安裝流程
1\ Unzip the 'trinity.zip', and copy all the script files into to the plugin directory of Vimfiles, such as ~/.vim/plugin/ 
3.1. Trinity語法
" Open and close all the three plugins on the same time 
nmap <F8>   :TrinityToggleAll<CR> 

" Open and close the srcexpl.vim separately 
nmap <F9>   :TrinityToggleSourceExplorer<CR> 

" Open and close the taglist.vim separately 
nmap <F10>  :TrinityToggleTagList<CR> 

" Open and close the NERD_tree.vim separately 
nmap <F11>  :TrinityToggleNERDTree<CR> 
3.2. taglist語法
map <F9> :Tlist<CR>
3.3. NERDTree語法
map <F9> :NERDTree<CR>

? Help
i: open file on split windows
t: open file on tab
o: Open file / directory
x: close directory
q: close

Linux效能測試工具

1. Linux效能測試工具整理
2. 參考來源
http://www.brendangregg.com/linuxperf.html
https://events.linuxfoundation.org/sites/events/files/slides/LinuxPerfTools_0.pdf
http://www.brendangregg.com/Slides/Velocity2015_LinuxPerfTools.pdf
http://www.tecmint.com/command-line-tools-to-monitor-linux-performance/

vim套件 - 使用pathogen來管理vim套件

1. pathogen.vim : Poor man's package manager. Easy manipulation of 'runtimepath' et al
Manage your 'runtimepath' with ease. In practical terms, pathogen.vim makes it super easy to install plugins and runtime files in their own private directories
http://www.vim.org/scripts/script.php?script_id=2332

2. 在.vimrc加入下面語法
Add this to your vimrc: 

    execute pathogen#infect() 
3. 在HOME下,新增.vim/autoload和.vim/bundle資料夾,把pathogen.vim放入autoload,其他套件放入bundle
$ mkdir -p ~/.vim/autoload ~/.vim/bundle 
$ curl -LSso ~/.vim/autoload/pathogen.vim https://tpo.pe/pathogen.vim
4. 目錄會像下列這樣,所有的套件都在bundle
$ tree -L 2
.
--- autoload
|   |__ pathogen.vim
--- bundle
    |__ bufexplorer-7.4.6
    |__ nerdtree
    |__ SrcExpl-5.3
    |__ taglist_46
    |__ Trinity
    |__ vim-fuzzyfinder
    |__ vim-l9

2016年3月28日 星期一

Raspberry Pi - 安裝中文語系和中文輸入法

1. 設定Raspberry Pi語系
$ sudo raspi-config
選擇 5 [Internationalisation Options]
選擇 I1 [Change Locale]
選取 [en-US.UTF8 UTF8]及[zh-TW.UTF8 UTF8]
設定系統預設語系 [en-US.UTF8]
2. 安裝中文字體 文泉驛微米黑 文泉驛正黑 文泉驛點陣宋體
$ sudo apt-get install ttf-wqy-microhei ttf-wqy-zenhei xfonts-wqy
3. 安裝中文輸入法後,重開Raspberry Pi
$ sudo apt-get install scim-chewing
4. 參考來源
http://blog.yslifes.com/archives/2070

Raspberry Pi - 透過VNC遠端連線

1. 在Raspberry Pi上安裝VNC
$ sudo apt-get install tightvncserver
2. 在Raspberry Pi啟動VNC,第一次啟動有兩組密碼要設定,第一組為遠端連線存取的密碼,必須8位數以上,第二組為遠端連線view only的密碼,可設定也可不設定
$ vncserver

You will require a password to access your desktops.

Password:
Verify:


Would you like to enter a view-only password (y/n)?
3. 在PC上安裝Chrome的擴充套件VNC
https://chrome.google.com/webstore/detail/vnc%C2%AE-viewer-for-google-ch/iabmpiboiopbgfabjmgeedhcmjenhbla
4. 在PC上啟動Chrome的擴充套件VNC
填入Raspberry Pi的IP address和port number,VNC所使用的port number必須為5901
5. 參考來源
https://www.raspberrypi.com.tw/586/setting-up-vnc/

安裝Xming + X11-Forwarding - 在Windows系統開啟Linux視窗軟體

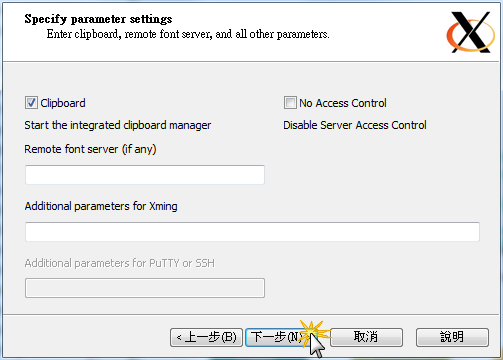
1. 安裝Xming
Xming is the leading X Window System Server for Microsoft Windows 8/7/Vista/XP (+ server 2012/2008/2003). It is fully featured, small and fast, simple to install and because it is standalone native Microsoft Windows, easily made portable (not needing a machine-specific installation).
2. 設定Xming配置
3. 設定putty,開啟X11 forwarding功能
4. 參考來源
http://www.straightrunning.com/XmingNotes/

2016年3月27日 星期日

Raspberry Pi - USB to RS232轉接 UART

1. Raspberry Pi 2要想看到UART的訊息,可以到市面上去買USB to RS232的連接線,分別接到GPIO14和GPIO15來將訊息輸出至PC的終端機上。
2. 第一種我們使用的是PL2303HX連接線,USB端先接至PC,接著將杜邦線接至Raspberry Pi 2,以下是PL2303HX和Raspberry Pi 2接線圖。
PL2303HX    to    Raspberry Pi 2

5v  (紅)    不用接
GND (黑)    -->   GND Pin06 
RXD (白)    -->   TXD Pin08 (GPIO14)
TXD (綠)    -->   RXD Pin10 (GPIO15)

3. 第二種我們使用的是MAX3232,MAX3232 COM PORT那端需連接RS232連接線至PC,另一端則使用杜邦線接至Raspberry Pi 2,以下是MAX3232和Raspberry Pi 2接線圖。
MAX3232     to    Raspberry Pi 2

5v          -->   VCC Pin04 DC Power 5v
GND         -->   GND Pin06 
RXD         -->   TXD Pin08 (GPIO14)
TXD         -->   RXD Pin10 (GPIO15)

Raspberry Pi 2 - 硬體架構圖

1. 硬體架構圖
2. BCM2835 datasheet
https://www.raspberrypi.org/wp-content/uploads/2012/02/BCM2835-ARM-Peripherals.pdf

2016年3月26日 星期六

Raspberry Pi - HDMI to VGA 到電腦螢幕

1. 原廠的Raspberry Pi只支援HDMI介面,如果想要把Raspberry Pi透過VGA介面接上螢幕,需要先購買HDMI to VGA的轉接器。
2. 原本的Raspberry Pi的設定,會把畫面輸出至HDMI,如果想把畫面透過VGA輸出至螢幕,必須修改/boot/config.txt。
$ sudo vi /boot/config.txt

# uncomment to force a specific HDMI mode (this will force VGA)
hdmi_group=2
hdmi_mode=16

# uncomment to force a HDMI mode rather than DVI. This can make audio work in
# DMT (computer monitor) modes
hdmi_drive=2
2.1 Force the monitor to HDMI mode so that sound will be sent over HDMI cable
hdmi_drive=2

2.2 Set monitor mode to DMT
hdmi_group=2

2.3 Set monitor resolution to 1024x768 XGA 60 Hz (HDMI_DMT_XGA_60)
hdmi_mode=16
3. 參考來源
http://elinux.org/RPiconfig

2016年3月24日 星期四

Hinet FTP測試程式 Stress test

1. 測試網路流量可以透過Hinet的FTP伺服器來測試,以下是上傳下載的帳號密碼
2. 利用命令提示字元,ftp ftp.speed.hinet.net,帳號密碼為ftp:ftp。
C:\Users\user>ftp ftp.speed.hinet.net
已連線到 ftp.speed.hinet.net。
220---------- Welcome to Pure-FTPd [privsep] [TLS] ----------
220-You are user number 99 of 1000 allowed.
220-Local time is now 20:02. Server port: 21.
220-This is a private system - No anonymous login
220-IPv6 connections are also welcome on this server.
220 You will be disconnected after 2 minutes of inactivity.
使用者 (ftp.speed.hinet.net:(none)): ftp
331 User ftp OK. Password required
密碼:
230-User ftp has group access to:  ftp
230 OK. Current restricted directory is /
ftp>
下載一個1M的檔案
ftp> get test_001m.zip
200 PORT command successful
150-Connecting to port 59437
150 1025.3 kbytes to download
226-File successfully transferred
226 0.622 seconds (measured here), 1.61 Mbytes per second
ftp: 1049903 位元組已接收,時間: 0.74秒數 1413.06KB/sec。
上傳一個1M的檔案
ftp> put test_001m.zip
200 PORT command successful
150 Connecting to port 60389
226-File successfully transferred
226 2.800 seconds (measured here), 366.18 Kbytes per second
ftp: 1049903 位元組已傳送,時間: 2.79秒數 376.71KB/sec。
3. 透過updownload-loop.bat重複呼叫updownload.txt,來重複上傳下載檔案的測試
新增一個txt檔updownload.txt,內容為測試步驟
open ftp.speed.hinet.net
ftp
ftp
hash
ls
get test_020m.zip
put test_020m.zip

bye
新增一個為bat檔為updownload-loop.bat,去執行updownload.txt的內容。
:123
ftp -s:updownload.txt
goto 123
4. 參考來源
http://speed.hinet.net/ftptest.htm

Raspberry Pi - 使用 WiFi 連線到無線基地台 WPA mode

1. 列出usb型號
$ lsusb
Bus 001 Device 005: ID 7392:7811 Edimax Technology Co., Ltd EW-7811Un 802.11n Wireless Adapter [Realtek RTL8188CUS]
2. 掃瞄無線區域網路的基地台
$ sudo iwlist wlan0 scan
wlan0     Scan completed :
          Cell 03 - Address: 40:4A:03:92:BA:4B
                    ESSID:"foo"
                    Protocol:IEEE 802.11bgn
                    Mode:Master
                    Frequency:2.462 GHz (Channel 11)
                    Encryption key:on
                    Bit Rates:144 Mb/s
                    Extra:rsn_ie=30140100000fac040100000fac040100000fac020c00
                    IE: IEEE 802.11i/WPA2 Version 1
                        Group Cipher : CCMP
                        Pairwise Ciphers (1) : CCMP
                        Authentication Suites (1) : PSK
                    Quality=88/100  Signal level=42/100
Address: 無線基地台 的 MAC Address
ESSID: 無線基地台的連線名稱
Protocol: 無線基地台支援的通訊協定
Mode: 無線基地台的模式
Frequency: 無線基也台傳輸的頻率和頻道
Encryption key: 無線基地台啟用加密協定
Bit Rates: 無線基地台的傳輸速度
IE: 無線基地台的加密方法
Quality & Singal Level: 無線基地台的訊號強度
3. 修改無線網路卡的設定值
sudo vi /etc/network/interfaces
auto lo
iface lo inet loopback
iface eth0 inet dhcp

allow-hotplug wlan0
iface wlan0 inet manual
wpa-roam /etc/wpa_supplicant/wpa_supplicant.conf

allow-hotplug wlan0: 支援熱插拔
iface wlan0 inet manual: 手動指定網路設定
wpa-roam /etc/wpa_supplicant/wpa_supplicant.conf: 使用 wpa_supplicant 設定無線網路參數
3. 修改wpa_supplicant.conf
$ sudo vi /etc/wpa_supplicant/wpa_supplicant.conf

ctrl_interface=DIR=/var/run/wpa_supplicant GROUP=netdev
update_config=1

network={
        ssid="foo"
        psk="1234567890123"
        proto=RSN
        key_mgmt=WPA-PSK
        pairwise=CCMP
        auth_alg=OPEN
}
IE: IEEE 802.11i/WPA2 Version 1 表示加密方式為 WPA2,所對應的欄位 proto。
RSN: WPA2
WPA: WPA1

Group Cipher : CCMP 
Pairwise Ciphers (1) : CCMP 表示 WPA2 使用 AES 加密方式,所對應的欄位 pairwise。
CCMP: AES cipher,WPA2
TKIP: TKIP cipher,WPA1

Authentication Suites (1) : PSK 表示使用 pre-shared key 做鑑別,所對應的欄位為 key_mgmt。
WPA-PSK:Authentication via pre-shared key
WPA-EAP:Authentication via enterprise authentication server。
相關wpa_supplicant.conf範例,可參考下列連結 http://w1.fi/gitweb/gitweb.cgi?p=hostap.git;a=blob_plain;f=wpa_supplicant/wpa_supplicant.conf 5. 將wireless介面關掉後,再啟動wireless介面
$ sudo ifdown wlan0

$ sudo ifup wlan0
6. 先砍掉wpa supplican,再重啟
$ sudo kill -9 $(ps -ef | grep wpa | awk '{print $2}')

$ sudo wpa_supplicant -B -i wlan0 -c /etc/wpa_supplicant/wpa_supplicant.conf
-B 表示以 daemon 方式在背景執行。
-i 表示指定介面(interface)名稱。
-c 表示設定檔路徑。
7. 啟動Dhcp Client去取得IP
$ sudo dhclient
8. 查看是否要到IP
$ ifconfig wlan0
wlan0     Link encap:Ethernet  HWaddr 74:da:38:05:68:4c  
          inet addr:192.168.1.117  Bcast:192.168.1.255  Mask:255.255.255.0
          UP BROADCAST RUNNING MULTICAST  MTU:1500  Metric:1
          RX packets:1158 errors:0 dropped:79 overruns:0 frame:0
          TX packets:53 errors:0 dropped:0 overruns:0 carrier:0
          collisions:0 txqueuelen:1000 
          RX bytes:109024 (106.4 KiB)  TX bytes:6214 (6.0 KiB)
9. 參考來源
SETTING WIFI UP VIA THE COMMAND LINE
[基礎] 命令列設置無線網路
Raspberry Pi 的基礎 - 使用 Wi-Fi 無線網卡連上網路

Raspberry Pi - WPA mode的Wireless Client

將Raspberry Pi的角色,變成Wireless Client
1.使用wpa_passphrase把密碼先加密一下
$ wpa_passphrase "HOME-2F" "aAbBcCdD"
2. 將密碼寫入/etc/wpa.conf
$ sudo vi /etc/wpa.conf
network={
        ssid="HOME-2F"
        #psk="aAbBcCdD"
        psk=1f09d3755fc2592aa4f4e282d3c57cce737e22dce4c3ccdca93852b3a7ee1283
}
3. 新增interface
$ sudo vi /etc/network/interfaces
iface wlan0 inet dhcp
wpa-scan-ssid 1
wpa-ap-scan 1
wpa-key-mgmt WPA-PSK
wpa-proto RSN WPA
wpa-pairwise CCMP TKIP
wpa-group CCMP TKIP
wpa-ssid "HOME-2F"
wpa-psk 1f09d3755fc2592aa4f4e282d3c57cce737e22dce4c3ccdca93852b3a7ee1283
4. 將wireless介面關掉
$ sudo ifdown wlan0
5. 將wireless介面啟動
$ sudo ifup wlan0

Raspberry Pi - 簡易的Wireless Client

將Raspberry Pi的角色,變成Wireless Client
1. 修改/etc/network/interfaces
$ sudo vi /etc/network/interfaces
iface wlan0 inet dhcp
wpa-ssid "HOME-HI"
wpa-psk "aAbBcCdD"
2. 將wireless介面關掉
$ sudo ifdown wlan0
3. 將wireless介面啟動
$ sudo ifup wlan0

Raspberry Pi - 下載安裝 toolchain

1. 安裝相關套件
$ sudo apt-get install make git-core ncurses-dev
2. 從Git Server下載toolchain
$ mkdir rpi
$ cd rpi
$ git clone https://github.com/raspberrypi/tools.git
3. 設定環境變數
$ vi ~/.bashrc
export PATH=$PATH:/home/allen/rpi/tools/arm-bcm2708/gcc-linaro-arm-linux-gnueabihf-raspbian/bin

如果編譯環境的主機是64位元
export PATH=$PATH:/home/allen/rpi/tools/arm-bcm2708/gcc-linaro-arm-linux-gnueabihf-raspbian-x64/bin
4. 編譯一個簡單的範例
$ vi hello.c
#include <stdio.h>
int main()
{
        printf("hello world\n");
        return 0;
}
$ arm-linux-gnueabihf-gcc hello.c -o hello-arm
5. 用file命令驗證編譯後的binary
$ file hello-arm
hello-arm: ELF 32-bit LSB executable, ARM, version 1 (SYSV), dynamically linked (uses shared libs), for GNU/Linux 2.6.26, not stripped

// 因為為arm平台的binary,所以在x86平台無法執行
$ ./hello-arm 
bash: ./hello-arm: cannot execute binary file
6. 把binary傳送到Raspberry pi上,然後執行看結果
$ scp hello-arm pi@192.168.1.2:/home/pi
pi@192.168.1.2's password: 
hello-arm                                                                                                                             100% 5447     5.3KB/s   00:00

$ ./hello-arm
hello, world

Raspberry Pi - 編譯新核心

1. 在Raspiberry Pi上,將kernel config存成檔案
$ zcat /proc/config.gz > .config
2. 從Git Server中,下載kernel source
$ cd rpi
$ git clone https://github.com/raspberrypi/linux.git

or

$ git clone --depth=1 https://github.com/raspberrypi/linux
3. 轉換kernel source到rpi-3.10.y
$ cd linux
$ git checkout rpi-3.10.y
列出所有branch
$ git branch -a
4. export環境變數
$ export ARCH=arm
$ export CROSS_COMPILE=arm-linux-gnueabihf-
5. 從Raspberry Pi的檔案系統中,取得kernel configuration。
$ make mrproper
$ scp pi@192.168.1.2:/home/pi/.config .
$ make ARCH=arm CROSS_COMPILE=arm-linux-gnueabihf- oldconfig

或者直接用source tree裡的config
(cd arch/arm/configs/ && ls bcm*)
arch/arm/configs/
./bcmrpi_defconfig
./bcm_defconfig
./bcm2709_defconfig
./bcm2835_defconfig
5.1. RASPBERRY PI 1 (OR COMPUTE MODULE) DEFAULT BUILD CONFIGURATION
cd linux
KERNEL=kernel
make bcmrpi_defconfig

$ make ARCH=arm CROSS_COMPILE=arm-linux-gnueabihf- bcmrpi_defconfig
5.2. RASPBERRY PI 2/3 DEFAULT BUILD CONFIGURATION
cd linux
KERNEL=kernel7
make bcm2709_defconfig

$ make ARCH=arm CROSS_COMPILE=arm-linux-gnueabihf- bcm2709_defconfig
6. 看需求,修改kernel config
$ make ARCH=arm CROSS_COMPILE=arm-linux-gnueabihf- menuconfig
7. 編譯kernel
$ make ARCH=arm CROSS_COMPILE=arm-linux-gnueabihf- -j 4

‘-j [jobs]’
‘--jobs[=jobs]’
Specifies the number of recipes (jobs) to run simultaneously.
8. 編譯 kernel module
$ mkdir ../modules
$ make modules_install ARCH=arm CROSS_COMPILE=arm-linux-gnueabihf- INSTALL_MOD_PATH=../modules/
9. 將kernel image相關檔案放到記憶卡
// RASPBERRY PI 1 (OR COMPUTE MODULE) DEFAULT BUILD CONFIGURATION
$ sudo cp -Rf ~/rpi/linux/arch/arm/boot/zImage ~/sdb1/boot/kernel.img

// RASPBERRY PI 2/3 DEFAULT BUILD CONFIGURATION
$ sudo cp -Rf ~/rpi/linux/arch/arm/boot/zImage ~/sdb1/boot/kernel7.img

// Kernel Modules
$ sudo cp -Rf ~/rpi/modules/lib/firmware/ ~/sdb2/lib/
$ sudo cp -Rf ~/rpi/modules/lib/modules/ ~/sdb2/lib/
10. 進入Raspberry Pi,修改將開機kernel image
$ vi /boot/config.txt
kernel=kernel-new.img

2016年3月18日 星期五

Bug Tracking System整理

Bugzilla
http://www.bugzilla.org

Mantis
http://www.mantisbt.org

Trac
http://trac.edgewall.org/

Redmine
http://www.redmine.org/
參考來源
http://www.thegeekstuff.com/2010/08/bug-tracking-system/

Raspberry Pi - 啟用DHCP伺服器 isc-dhcp-server

1. 安裝 isc-dhcp-server
$ sudo apt-get install isc-dhcp-server
[FAIL] Starting ISC DHCP server: dhcpd[....] check syslog for diagnostics. ... failed!
 failed!
invoke-rc.d: initscript isc-dhcp-server, action "start" failed.
2. 修改/etc/network/interfaces,設定網路組態
$ vi /etc/network/interfaces
#iface eth0 inet dhcp
allow-hotplug eth0
iface eth0 inet static
  address 192.168.0.1
  netmask 255.255.255.0
  gateway 192.168.0.1
3. 修改DHCP configuration file,加入DHCP Server的相關設定
$ vi /etc/dhcp/dhcpd.conf
subnet 192.168.0.0 netmask 255.255.255.0 {
  range 192.168.0.200 192.168.0.253;
  option routers 192.168.0.1;
  option broadcast-address 192.168.0.255;
  default-lease-time 600;
  max-lease-time 7200;
  option domain-name-servers 168.95.1.1;
}
4. 指定isc-dhcp-server所工作的網路介面
$ vi /etc/default/isc-dhcp-server
# On what interfaces should the DHCP server (dhcpd) serve DHCP requests?
#       Separate multiple interfaces with spaces, e.g. "eth0 eth1".
INTERFACES="eth0"
5. 啟動isc-dhcp-server
$ sudo service isc-dhcp-server restart
[ ok ] Stopping ISC DHCP server: dhcpd.
[ ok ] Starting ISC DHCP server: dhcpd.

Raspiberry Pi - 開機自動登入

1. 修改 /etc/inittab
$ sudo vi /etc/inittab
2. 註解原本的設定,並加入最後一行
#Spawn a getty on Raspberry Pi serial line
#T0:23:respawn:/sbin/getty -L ttyAMA0 115200 vt100
T0:23:respawn:/bin/login -f pi ttyAMA0 /dev/ttyAMA0 2>&1

2016年3月17日 星期四

磁碟效能測試工具: fio

1. fio
fio is an I/O tool meant to be used both for benchmark and stress/hardware verification. It has support for 19 different types of I/O engines (sync, mmap, libaio, posixaio, SG v3, splice, null, network, syslet, guasi, solarisaio, and more), I/O priorities (for newer Linux kernels), rate I/O, forked or threaded jobs, and much more. It can work on block devices as well as files. fio accepts job descriptions in a simple-to-understand text format. Several example job files are included. fio displays all sorts of I/O performance information, including complete IO latencies and percentiles. Fio is in wide use in many places, for both benchmarking, QA, and verification purposes. It supports Linux, FreeBSD, NetBSD, OpenBSD, OS X, OpenSolaris, AIX, HP-UX, Android, and Windows.

2. Usage
name=str        ASCII name of the job.

filename=str    Fio normally makes up a filename based on the job name,
                thread number, and file number.

rw=str          Type of io pattern. Accepted values are:

                        read            Sequential reads
                        write           Sequential writes
                        randwrite       Random writes
                        randread        Random reads
                        rw,readwrite    Sequential mixed reads and writes
                        randrw          Random mixed reads and writes

rwmixread=int   How large a percentage of the mix should be reads.

size=int        The total size of file io for this job.

bs=int          The block size used for the io units.

ioengine=str    Defines how the job issues io to the file. The following
                types are defined:

                        sync    Basic read(2) or write(2) io. lseek(2) is
                                used to position the io location.

                        psync   Basic pread(2) or pwrite(2) io.

                        vsync   Basic readv(2) or writev(2) IO.

                        psyncv  Basic preadv(2) or pwritev(2) IO.

iodepth=int     This defines how many io units to keep in flight against
                the file.

direct=bool     If value is true, use non-buffered io.

numjobs=int     Create the specified number of clones of this job.

group_reporting It may sometimes be interesting to display statistics for
                groups of jobs as a whole instead of for each individual job.

thread          fio defaults to forking jobs, however if this option is
                given, fio will use pthread_create(3) to create threads
                instead.
3. Performance Test
Sequential read
$ fio -name=test -rw=read -size=1G -bs=16k -ioengine=libaio -iodepth=16 -direct=1 -numjobs=16 -group_reporting
Sequential write
$ fio -name=test -rw=write -size=1G -bs=16k -ioengine=libaio -iodepth=16 -direct=1 -numjobs=16 -group_reporting
Random read
$ fio -name=test -rw=randread -size=1G -bs=16k -ioengine=libaio -iodepth=16 -direct=1 -numjobs=16 -group_reporting
Random write
$ fio -name=test -rw=randwrite -size=1G -bs=16k -ioengine=libaio -iodepth=16 -direct=1 -numjobs=16 -group_reporting
Sequential mixed read and write
$ fio -name=test -rw=rw -rwmixread=50 -size=1G -bs=16k -ioengine=libaio -iodepth=16 -direct=1 -numjobs=16 -group_reporting
Random mixed read & write
$ fio -name=test -rw=randrw -rwmixread=50 -size=1G -bs=16k -ioengine=libaio -iodepth=16 -direct=1 -numjobs=16 -group_reporting
4. 參考來源
http://linux.die.net/man/1/fio

磁碟latency測試工具 - ioping

1. ioping
This tool lets you monitor I/O latency in real time. It shows disk latency in the same way as ping shows network latency.

2. Usage
Usage: ioping [-LABCDWRq] [-c count] [-w deadline] [-pP period] [-i interval] 
              [-s size] [-S wsize] [-o offset] directory|file|device
       ioping -h | -v

     -c       stop after  requests
     -w    stop after 
     -p      print raw statistics for every  requests
     -P      print raw statistics for every  in time
     -i    interval between requests (1s)
     -s        request size (4k)
     -S       working set size (1m)
     -o      working set offset (0)
     -L              use sequential operations (includes -s 256k)
     -A              use asynchronous I/O
     -C              use cached I/O
     -D              use direct I/O
     -W              use write I/O *DANGEROUS*
     -R              seek rate test (same as -q -i 0 -w 3 -S 64m)
     -B              print final statistics in raw format
     -q              suppress human-readable output
     -h              display this message and exit
     -v              display version and exit
3. Performance Test
Run ioping with direct I/O
$ ioping -D -c 60 /dev/sda
Run ioping with cached I/O
$ ioping -C -c 60 /dev/sda
Run ioping with async I/O
$ ioping -A -c 60 /dev/sda
4. 參考來源
https://code.google.com/archive/p/ioping/
http://manpages.ubuntu.com/manpages/saucy/man1/ioping.1.html

Ubuntu安裝NFS Server和NFS Client

NFS Server:
1. 安裝NFS Server
$ sudo apt-get install nfs-common
$ sudo apt-get install nfs-kernel-server
2. 設定/etc/exports
$ sudo vi /etc/exports
/home/nfsroot *(rw,sync,no_root_squash,no_all_squash)
3. 啟動NFS Server
$ sudo /etc/init.d/nfs-kernel-server start
4. 檢查NFS Server是否啟動
$ showmount -e localhost
Export list for localhost:
/home/nfsroot *(rw,sync,no_root_squash,no_all_squash)
NFS Client:
1. Kernel必須支援NFS.

2. mount遠端NFS Server
$ mount -onolock 192.168.1.200:/home/nfsroot /var/webs

2016年3月15日 星期二

Raspberry Pi 工具- 燒錄映像檔

1. 下載SDFormatter v4.0,先將記憶卡格式化
https://www.sdcard.org/cht/downloads/formatter_4/
2. Raspberry Pi的映像檔有兩種,可至以下網址下載
https://www.raspberrypi.org/downloads/
2.1. 安裝NOOBS
將所有檔案全部複製到記憶卡即可
2.2. 安裝RASPBIAN
需要下載Win32DiskImager,透過Win32DiskImager將映像檔燒錄至記憶卡
7. 參考來源
https://www.raspberrypi.org/documentation/installation/installing-images/windows.md