          ---------------------------------------------
         |        wlan0          |         eth0        |
       LAN PC               Raspberry Pi             Modem
  IP: 192.168.0.100             br0             IP: 192.168.0.1
  GW: 192.168.0.1
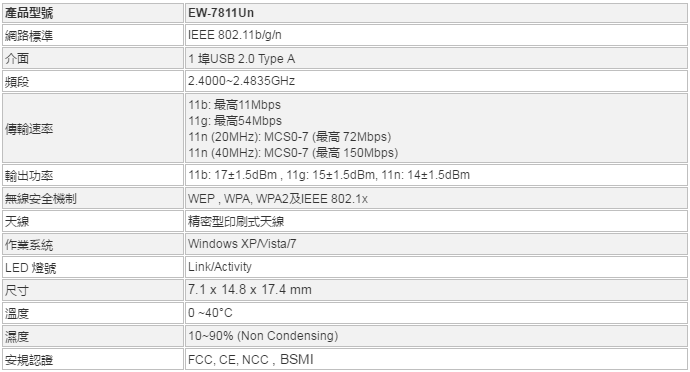
2. 準備一張Edimax EW-7811Un無線網卡wlan0,當作Raspberry Pi的LAN內建的Ethernet網卡eth0,當作Raspberry Pi的WAN
http://www.edimax.com/edimax/merchandise/merchandise_detail/data/edimax/tw/wireless_adapters_n150/ew-7811un/

$ lsusb
Bus 001 Device 005: ID 3538:0901 Power Quotient International Co., Ltd
Bus 001 Device 004: ID 7392:7811 Edimax Technology Co., Ltd EW-7811Un 802.11n Wireless Adapter [Realtek RTL8188CUS]
Bus 001 Device 003: ID 0424:ec00 Standard Microsystems Corp. SMSC9512/9514 Fast Ethernet Adapter
Bus 001 Device 002: ID 0424:9514 Standard Microsystems Corp.
Bus 001 Device 001: ID 1d6b:0002 Linux Foundation 2.0 root hub
4. 安裝hostapd套件,讓無線網卡模擬成Soft AP
$ sudo apt-get install hostapd由於內建的hostapd不支援此張網卡,需要先移除hostpad程式,但保留相關的設定檔
$ sudo apt-get remove hostapd5. Edimax EW-7811Un的驅動程式,需要從Realtek官網下載,請選擇RTL8188CUS的Linux版本
首頁 > 下載中心 > 通訊網路 ICs > Wireless LAN ICs > WLAN NIC > IEEE 802.11b/g/n Single-Chip > Software > RTL8188CUS Linux
http://www.realtek.com/downloads/downloadsView.aspx?Langid=2&PNid=21&PFid=48&Level=5&Conn=4&DownTypeID=3&GetDown=false&Downloads=true#2742

透過wget命令,下載原廠無線網卡驅動程式到Raspberry Pi
$ wget http://12244.wpc.azureedge.net/8012244/drivers/rtdrivers/cn/wlan/0001-RTL8188C_8192C_USB_linux_v4.0.2_9000.20130911.zip6. 安裝hostapd程式
$ unzip 0001-RTL8188C_8192C_USB_linux_v4.0.2_9000.20130911.zip

$ cd RTL8188C_8192C_USB_linux_v4.0.2_9000.20130911/wpa_supplicant_hostapd/

$ tar -zxvf wpa_supplicant_hostapd-0.8_rtw_r7475.20130812.tar.gz

$ cd wpa_supplicant_hostapd-0.8_rtw_r7475.20130812/hostapd

$ make clean && make && sudo make install
將hostapd相關檔案複製到/usr/bin
$ sudo cp /usr/local/bin/hostapd* /usr/sbin7. 安裝wireless工具
$ cd ../../../wireless_tools

$ tar -zxvf wireless_tools.30.rtl.tar.gz

$ cd wireless_tools.30.rtl

$ make clean && make && sudo make install
8. 建立hostapd設定檔
driver: 無線網卡的驅動程式
ssid: 基地台名稱。
channel: 無線通訊的頻道,從1到11
wpa: 無線網路加密協定,1是WPA,2是WPA2
wpa_passphrase: 無線基地台的密碼。
$ sudo vi /etc/hostapd/hostapd.conf

interface=wlan0
driver=rtl871xdrv
bridge=br0
ssid=pi
channel=6
hw_mode=g
ieee80211n=1
wmm_enabled=1
wpa=2
wpa_passphrase=raspberry
wpa_key_mgmt=WPA-PSK
wpa_pairwise=TKIP
rsn_pairwise=CCMP
auth_algs=1
macaddr_acl=0
測試hosapd設定檔
$ sudo hostapd -dd /etc/hostapd/hostapd.conf如沒有出現錯誤,按Ctrl+C停止hostapd,編輯hostapd服務設定檔
$ sudo vi /etc/default/hostapd

# Defaults for hostapd initscript
#
# See /usr/share/doc/hostapd/README.Debian for information about alternative
# methods of managing hostapd.
#
# Uncomment and set DAEMON_CONF to the absolute path of a hostapd configuration
# file and hostapd will be started during system boot. An example configuration
# file can be found at /usr/share/doc/hostapd/examples/hostapd.conf.gz
#
#DAEMON_CONF=""
DAEMON_CONF="/etc/hostapd/hostapd.conf"

# Additional daemon options to be appended to hostapd command:-
#       -d   show more debug messages (-dd for even more)
#       -K   include key data in debug messages
#       -t   include timestamps in some debug messages
#
# Note that -B (daemon mode) and -P (pidfile) options are automatically
# configured by the init.d script and must not be added to DAEMON_OPTS.
#
#DAEMON_OPTS=""
啟動hostapd服務
$ sudo service hostapd restart開機時自動啟動hostapd服務
$ sudo update-rc.d hostapd defaults9. 安裝網路橋接功能套件
$ sudo apt-get -y install bridge-utils10. 修改無線網卡的設定值,加入橋接功能
$ sudo vi /etc/network/interfaces

# interfaces(5) file used by ifup(8) and ifdown(8)

# Please note that this file is written to be used with dhcpcd
# For static IP, consult /etc/dhcpcd.conf and 'man dhcpcd.conf'

# Include files from /etc/network/interfaces.d:
source-directory /etc/network/interfaces.d

auto lo
iface lo inet loopback

iface eth0 inet manual

#allow-hotplug wlan0
#iface wlan0 inet manual
#    wpa-conf /etc/wpa_supplicant/wpa_supplicant.conf

#allow-hotplug wlan1
#iface wlan1 inet manual
#    wpa-conf /etc/wpa_supplicant/wpa_supplicant.conf

auto br0
iface br0 inet dhcp
bridge_ports eth0 wlan0
11. 重新啟動
$ sudo reboot12. 重新啟動後,可下brctl橋接命令,確認橋接模式
$ brctl show
bridge name     bridge id               STP enabled     interfaces
br0             8000.74da3855819b       no              eth0
                                                        wlan0
13. 參考來源RPI-Wireless-Hotspot
Raspberry Pi 的應用 - Wi-Fi 無線基地台
Raspberry Pi 的實作 - 自動配置 IP 位址資訊的 DHCP Server
敗家學習之旅之樹莓派(Raspberry Pi) Realtek WIFI AP 架設成功心得分享