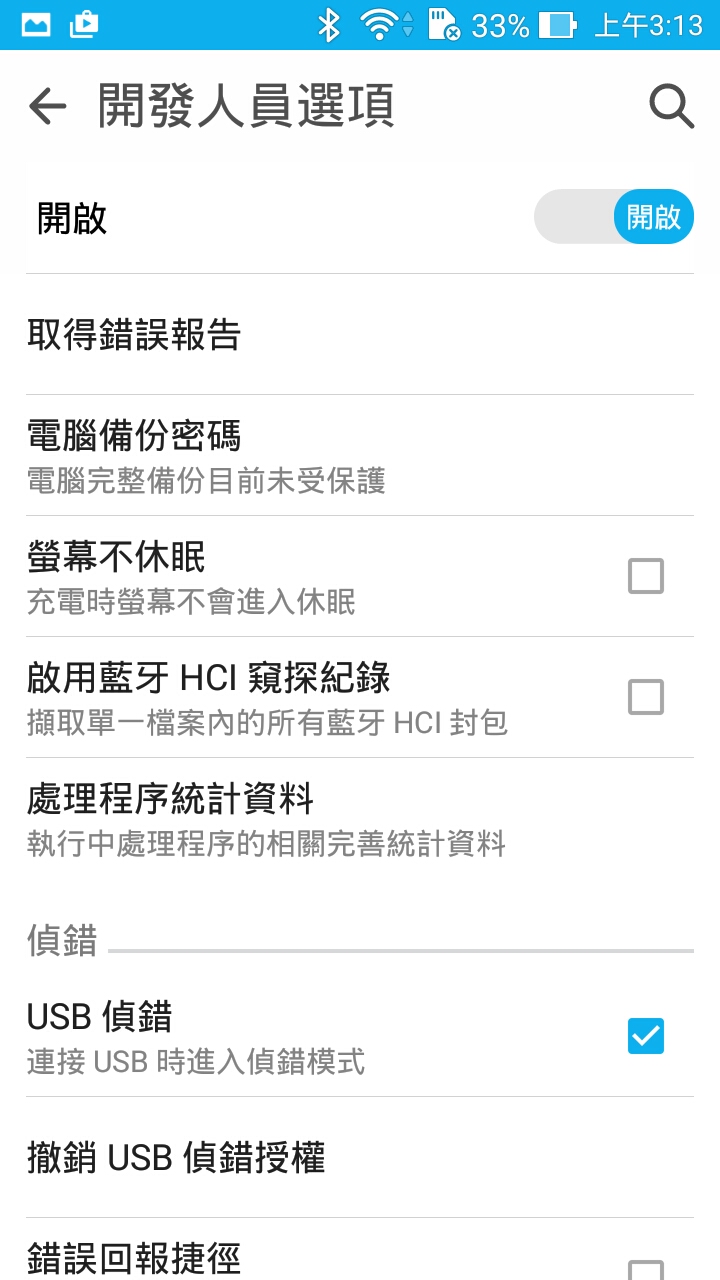
1. 設定 -> 關於 -> 軟體資訊 -> 版本號碼,連點 7 次


2. 設定 -> 開發人員選項,回到設定就會出現開發人員選項


3. 設定 -> 開發人員選項 -> USB偵錯,勾選USB偵錯進入偵錯模式。
2016年12月22日 星期四
Zenfone 開啟USB偵錯模式


Zenfone 5 (A500CG) 刷機更新 Android 4.4.2 -> 5.0
1. 更新前,檢查目前Android版本和軟體版本號碼

設定 -> 關於 -> Android 版本: 4.4.2


設定 -> 關於 -> 軟體資訊 -> 版本號碼: ASUS_T00F_TW_user_2.22.40.54


2. 拔掉SIM卡和Micro SD卡,以避免更新時出現問題

3. 將USB線連接手機和電腦

4. 把UL-ASUS_T00F-TW-3.24.40.87-user.zip檔案放到手機內部儲存空間,然後拔掉USB線

http://dlcdnet.asus.com/pub/ASUS/ZenFone/A500CG/UL-ASUS_T00F-TW-3.24.40.87-user.zip

版本 TW_3.24.40.87((Andriod L)
==================================================================================================
ASUS ZenFone 5(T00F/T00J)軟體版本: V3.24.40.87 (Android L)僅限TW版本使用*
1)改善3G網路穩定度
2)改善通話品質
3)改善省電模式的穩定度
4)修正zentalk網頁連結的問題
5)修正影片播放問題
6)升级Google安全性功能
7)更新APN設定

更多詳情請洽以下連結:
TW:http://www.asus.com/zentalk/tw/ReleaseNotes
WW:http://www.asus.com/zentalk/ReleaseNotes
CN:http://zentalk.asus.com.cn/ReleaseNotes

1) 由V3.24.40.78 (Andriod L) 更新至此版韌體3.24.40.87 (Android L) 支援FOTA 更新.
   若由其他 Andriod L 韌體版本欲更新至此版韌體3.24.40.87 (Android L) 僅限手動更新

2) 若裝置內韌體版本為 Kitkat , 請先手動更新升級至 2.22.40.540 後再手動更新至此版Andriod L (V3.24.40.87)

更新步驟:
1. 檢查裝置使用的版本**
2. 下載裝置軟體和更新步驟手冊(從”手冊”欄位)
3. 只能在相同的版本更新, 譬如: WW->WW, CN->CN, TW->TW.
4. 軟體更新無法轉換成其他的版本與降版.
5. 錯誤的版本會造成更新失敗, 請使用相同的版本進行更新
*如何知道裝置的型號?
路徑:設定->關於->型號
**如何知道裝置的軟體版本?
路徑:設定->關於->軟體資訊->版本號碼
***系統升級有可能導致部分資料遺失,建議在升級前妥善備份重要資料。

檔案大小: 723.71 MBytes
==================================================================================================


5. 拔後USB線後,跳出更新訊息,點選確認更新

6. 更新過程中,會進入小綠人畫面,然後重開機之後,會進入套件更新畫面。
Note 1. 更新過程中,可能會遇到突然關機的情況,請按電源鍵開機。
Note 2. 更新過程中,可能會遇到在進入開機畫面時轉圈圈很久,直接按電源鍵關閉電源再開啟。

7. 更新完後,建議雙清(WIPE),雙清前請先將手機資料備份。
7.1 進入FastBoot Mode
    關機狀態,按住[音量上鍵]和按住[電源鍵],待手機開機震動後,此時[音量上鍵]壓著不放,放掉[電源鍵],開機後進入FastBoot Mode。

7.2 FastBoot選單中選擇RECOVERY MODE
    進入FastBoot Mode,最上方會出現[綠框NORMAL Boot],按[音量下鍵]選擇到出現[紅框RECOVERY MODE],按[電源鍵]後會自動開機。

7.3 進入Recovery Mode
    開機後會顯示倒地的小綠人和Error!後,壓住[電源鍵]後,馬上按壓一下[音量上鍵],即可進入Recovery Mode。

7.4 Wipe data/factory reset
    按[音量下鍵]選擇到wipe data/factory reset,按下[電源鍵]執行,使用[音量下鍵]移動選Yes --delete all user data,
    按下[電源鍵]執行。

7.5 Wipe cache partition
    按[音量下鍵]選擇到wipe cache partition,按下[電源鍵]執行。

7.6 Reboot system now
    執行上述動作後,使用[音量上鍵]選到Reboot system now,重新開機完後就已經執行完雙Wipe動作,也就是手機還原至出廠預設狀態。

8. 更新後,檢查目前Android版本和軟體版本號碼
設定 -> 關於 -> Android 版本: 5.0


設定 -> 關於 -> 軟體資訊 -> 版本號碼: ASUS_T00F_TW_user_3.24.40.87


9. 參考來源
https://www.asus.com/zentalk/tw/thread-82898-1-1.html


2016年12月6日 星期二
淘寶購物 - 直送/集運商 手續費用計算
1. 在淘寶購物,如果掌櫃沒有提供直送台灣的服務,就必須找官方或私人的集運商,透過集運的方式轉運到台灣,等於是跟集運商購買一種集運的商品,所以除了原本的商品需要手續費之外,集運也需要手續費。這個時候透過不同付款方式,就可以節省一些手續費,以下將介紹在淘寶購物的幾種付款方式。
2. 以便利性和節省性,來看三種付款方式
3. 各種付款方式手續費
4. 各種付款方式的範例
2. 以便利性和節省性,來看三種付款方式
便利性: 信用卡扣款 > 玉山銀行轉帳 = 它行轉帳
節省性: 玉山銀行轉帳 > 信用卡扣款 > 它行轉帳
3. 各種付款方式手續費
                        信用卡+直送    信用卡+集運    玉山轉帳+直送    玉山轉帳+集運    它行轉帳+直送    它行轉帳+集運

商品(刷卡/交易)手續費     3%            3%            1%              1%              1%              1%

商品海外交易手續費        1.5%          1.5%          X               X               X               X

集運刷卡手續費            X             3%            X               1%              X               1%

集運海外交易手續費        X             1.5%          X               X               X               X

跨行轉帳手續費            X             X             X               X               15 TWD          15*2 TWD
4. 各種付款方式的範例
4.1 信用卡結帳
淘寶上的結帳金額只包括: 商品金額 + 商品刷卡手續費(3%)
海外交易手續費(1.5%)只會在信用卡帳單上看到

[1] 商品金額: 100元 RMB
[2] 商品刷卡手續費(3%): [1] * 3% = 100 * 3% = 3元 RMB
[3] 商品海外交易手續費(1.5%): ([1] + [2]) * 1.5% = (100 + 3) * 1.5% = 1.5元 RMB

[4] 集運金額: 50元 RMB
[5] 集運刷卡手續費(3%): [4] * 3% = 50 * 3% = 1.5元 RMB
[6] 集運海外交易手續費(1.5%): ([4] + [5]) * 1.5% = (50 + 1.5) * 1.5% = 0.7元 RMB

[7] 商品+集運金額: [1] + [2] + [4] + [5] = 100 + 3 + 50 + 1.5 = 154.5元 RMB
[8] 商品+集運交易手續費: [3] + [6] = 1.5 + 0.7 = 2.2元 RMB

[9] 總計: [7] + [8] = 156.7元 RMB
4.2 玉山銀行轉帳
淘寶上的結帳金額只包括: 商品金額 + 商品交易手續費(1%)

[1] 商品金額: 100元 RMB
[2] 商品交易手續費(1%) = [1] * 1% = 100 * 1% = 1元 RMB

[3] 集運金額: 50元 RMB
[4] 集運交易手續費(1%) = [3] * 1% = 50 * 1% = 0.5元 RMB

[5] 商品+集運金額: [1] + [3] = 100 + 50 = 150元 RMB
[6] 商品+集運交易手續費: [2] + [4] = 1 + 0.5 = 1.5元 RMB

[7] 總計: [5] + [6] = 151.5元 RMB
4.3 它行轉帳
淘寶上的結帳金額只包括: 商品金額 + 商品交易手續費(1%)
轉帳手續費(15 TWD)會在跨行轉帳時扣款

[1] 商品金額: 100元 RMB
[2] 商品交易手續費(1%) = [1] * 1% = 100 * 1% = 1元 RMB
[3] 跨行轉帳手續費: 15元 TWD

[4] 集運金額: 50元 RMB
[5] 集運交易手續費(1%): [4] * 1% = 50 * 1% = 0.5元 RMB
[6] 跨行轉帳手續費: 15元 TWD

[7] 商品+集運金額: [1] + [4] = 100 + 50 = 150元 RMB
[8] 商品+集運交易手續費: [2] + [5] = 1 + 0.5 = 1.5元 RMB
[9] 商品+集運跨行轉帳手續費: [3] + [6] = 15 + 15 = 30元 TWD

[10] 總計: ([7] + [8]) + [9] = 151.5元 RMB + 30元 TWD
2016年11月24日 星期四
C語言: 資料空間
面試時,常常會遇到一些考題是有關資料空間,下面範例整理一些例子。
1. str[]: 宣告字元陣列時,會自動在字串後加一個換行字元'\n',ASCII為10,所以原本的字元數還需要加一個換行字元,才是整個字元陣列的長度。
2. p: 宣告指標主要用來存放位址使用,位址的空間會隨著系統是32位元或64位元而改變,如果系統是32位元,則指標長度是4 bytes,如果系統是64位元,則指標長度為8 bytes。
3. int: 宣告整數時,長度為4 bytes。
#include <stdio.h>
#include <stdlib.h>


int main(int argc, char *argv[]) {
 char str[] = "Hello";
 char *p = str;
 int n = 10;

 printf("sizeof(str) = %d\n", sizeof(str));
 printf("sizeof(p) = %d\n", sizeof(p));
 printf("sizeof(int) = %d\n", sizeof(n));
 return 0;
}
執行結果
sizeof(str) = 6
sizeof(p) = 8
sizeof(int) = 4
1. str[]: 宣告字元陣列時,會自動在字串後加一個換行字元'\n',ASCII為10,所以原本的字元數還需要加一個換行字元,才是整個字元陣列的長度。
2. p: 宣告指標主要用來存放位址使用,位址的空間會隨著系統是32位元或64位元而改變,如果系統是32位元,則指標長度是4 bytes,如果系統是64位元,則指標長度為8 bytes。
3. int: 宣告整數時,長度為4 bytes。
2016年11月19日 星期六
C語言: 遞迴用法
一個會呼叫自己本身的函數稱為遞迴(Resursive)。在實作遞迴函數時,最重要的一點就是必須有一個結束點的判斷。
如n階層,很適合用遞迴來實作
以非迴圈方式來實作n階層
2. 遞迴使用很多空間來存放暫時的結果,程式看起來比迴圈的方式簡單,但執行時間會花更多時間。
如n階層,很適合用遞迴來實作
n! = n * (n - 1)!
(n - 1)! = (n - 1) * (n - 2)!
(n - 2)! = (n - 2) * (n - 3)!
:
:
1! = 1
以遞迴方式來實作n階層
#include <stdio.h>
#include <stdlib.h>

long Factorial(long n)
{
 if (n == 0 || n == 1)
  return 1;
 else
  return n * Factorial(n - 1);
}

int main(int argc, char *argv[]) {
 int i = 0;

 for (i = 1; i <= 10; i++)
  printf("Factorial(%2d) = %d\n", i, Factorial(i));

 return 0;
}
執行結果
fact( 1) = 1
fact( 2) = 2
fact( 3) = 6
fact( 4) = 24
fact( 5) = 120
fact( 6) = 720
fact( 7) = 5040
fact( 8) = 40320
fact( 9) = 362880
fact(10) = 3628800
以非迴圈方式來實作n階層
#include <stdio.h>
#include <stdlib.h>

long Factorial(long n)
{
 int i = 0;
 long sum = 1;

 if (n == 0 || n == 1)
  return 1;
 else
  for (i = 2; i <= n; i ++)
   sum *= i;
 return sum;
}

int main(int argc, char *argv[]) {
 int i = 0;

 for (i = 1; i <= 10; i++)
  printf("Factorial(%2d) = %d\n", i, Factorial(i));

 return 0;
}
執行結果
fact( 1) = 1
fact( 2) = 2
fact( 3) = 6
fact( 4) = 24
fact( 5) = 120
fact( 6) = 720
fact( 7) = 5040
fact( 8) = 40320
fact( 9) = 362880
fact(10) = 3628800
1. 在實作遞迴程式時,如果結束點定義錯誤,有可能造成stack overflow的情況發生。
2. 遞迴使用很多空間來存放暫時的結果,程式看起來比迴圈的方式簡單,但執行時間會花更多時間。
2016年10月26日 星期三
Linux kernel - wait_event_interruptible 用法
init_waitqueue_head
wait_event_interruptible
wake_up_interruptible
include/linux/wait.h
/*
 * The below macro ___wait_event() has an explicit shadow of the __ret
 * variable when used from the wait_event_*() macros.
 *
 * This is so that both can use the ___wait_cond_timeout() construct
 * to wrap the condition.
 *
 * The type inconsistency of the wait_event_*() __ret variable is also
 * on purpose; we use long where we can return timeout values and int
 * otherwise.
 */

#define ___wait_event(wq, condition, state, exclusive, ret, cmd)        \
({                                                                      \
        __label__ __out;                                                \
        wait_queue_t __wait;                                            \
        long __ret = ret;       /* explicit shadow */                   \
                                                                        \
        INIT_LIST_HEAD(&__wait.task_list);                              \
        if (exclusive)                                                  \
                __wait.flags = WQ_FLAG_EXCLUSIVE;                       \
        else                                                            \
                __wait.flags = 0;                                       \
                                                                        \
        for (;;) {                                                      \
                long __int = prepare_to_wait_event(&wq, &__wait, state);\
                                                                        \
                if (condition)                                          \
                        break;                                          \
                                                                        \
                if (___wait_is_interruptible(state) && __int) {         \
                        __ret = __int;                                  \
                        if (exclusive) {                                \
                                abort_exclusive_wait(&wq, &__wait,      \
                                                     state, NULL);      \
                                goto __out;                             \
                        }                                               \
                        break;                                          \
                }                                                       \
                                                                        \
                cmd;                                                    \
        }                                                               \
        finish_wait(&wq, &__wait);                                      \
__out:  __ret;                                                          \
})


#define __wait_event_interruptible(wq, condition)                       \
        ___wait_event(wq, condition, TASK_INTERRUPTIBLE, 0, 0,          \
                      schedule())


/**
 * wait_event_interruptible - sleep until a condition gets true
 * @wq: the waitqueue to wait on
 * @condition: a C expression for the event to wait for
 *
 * The process is put to sleep (TASK_INTERRUPTIBLE) until the
 * @condition evaluates to true or a signal is received.
 * The @condition is checked each time the waitqueue @wq is woken up.
 *
 * wake_up() has to be called after changing any variable that could
 * change the result of the wait condition.
 *
 * The function will return -ERESTARTSYS if it was interrupted by a
 * signal and 0 if @condition evaluated to true.
 */
#define wait_event_interruptible(wq, condition)                         \
({                                                                      \
        int __ret = 0;                                                  \
        might_sleep();                                                  \
        if (!(condition))                                               \
                __ret = __wait_event_interruptible(wq, condition);      \
        __ret;                                                          \
})
wait_event_interruptible和wake_up_interruptible小例子:
#include <linux/module.h>
#include <linux/init.h>
#include <linux/sched.h>
#include <linux/fs.h>
#include <asm/uaccess.h>

MODULE_LICENSE("Dual BSD/GPL");

unsigned int globalvar = 0;
wait_queue_head_t myqueue;
unsigned int flag = 0;

static ssize_t myread(struct file *file, char *buf, size_t size, loff_t *loff)
{
        wait_event_interruptible(myqueue , flag != 0);
        if(copy_to_user(buf, &globalvar, sizeof(int)))
        {
                printk("copy to user failed/n");
                return -EFAULT;
        }
        flag = 0;
        return sizeof(int);
}

static ssize_t mywrite(struct file *file, const char *buf, size_t size, loff_t *loff)
{
        if(copy_from_user(&globalvar, buf, sizeof(int)))
        {
                printk("copy from user failed/n");
                return -EFAULT ;
        }
        wake_up_interruptible(&myqueue);
        flag = 1;
        return sizeof(int);
}

static const struct file_operations fops = {
        .read  = myread,
        .write = mywrite
};

static int __init mod_init(void)
{
        int ret;
        ret = register_chrdev(133 , "mychar", &fops);
        if(ret < 0)
                printk("<0>""register char dev failed/n");
        init_waitqueue_head(&myqueue);
        return 0;
}

static void __exit mod_exit(void)
{
        unregister_chrdev(133, "mychar");
}

module_init(mod_init);
module_exit(mod_exit);
參考來源
http://blog.sina.com.cn/s/blog_4770ef020101h45d.html
Kernel timer 用法
#include <linux/module.h>
#include <linux/init.h>

MODULE_LICENSE("Dual BSD/GPL");

#define TIMEOUT_VALUE (5 * HZ)

static struct timer_list tickfn;

static void sample_timeout(unsigned long arg)
{
    struct timer_list *tick = (struct timer_list *) arg;

    printk(KERN_ALERT "ptr %p\n", tick);

    mod_timer(tick, jiffies + TIMEOUT_VALUE);
}

static int __init sample_init(void)
{
    printk(KERN_ALERT "driver loaded\n");

    init_timer(&tickfn);
    tickfn.function = sample_timeout;
    tickfn.data = (unsigned long) &tickfn;
    tickfn.expires = jiffies + TIMEOUT_VALUE;
    add_timer(&tickfn);

    return 0;
}

static void __exit sample_exit(void)
{
    int ret;
    ret = del_timer_sync(&tickfn);

    printk(KERN_ALERT "driver unloaded (%d)\n", ret);
}

module_init(sample_init);
module_exit(sample_exit);
2016年10月7日 星期五
中國移動 中國及香港兩地 4G上網卡
中國內地及香港兩地流動數據儲值卡
-          享有1.2GB的4G漫遊數據,可用120日。
-          內附一張預付儲值卡及說明書。
-          使用範圍:中國內地及香港。
-          插卡即可使用,無須登記。
-          可轉換至NANO、MICRO、NORMAL SIM,無需剪卡。
-          有效日期至2017年06月30日,開卡後可用120日。

-         注意事項:
  1)     請在中國內地或香港插入和啟用此卡。
  2)     所有預付卡為一次性使用儲值卡,不可充值。
  3)     用戶若持有鎖機的手機,必須請電信公司解鎖手機,方能使用此SIM卡。
  4)      中國內地4G數據服務適用於中國移動4G TDD-LTE制式網絡,而服務須配合適合的上網設備。
  5)      如客戶在香港身處4G覆蓋以外地區,仍會透過2G EDGE/3G網絡為客戶提供服務。
  6)      於中國內地時數據用量只適用於中國移動2G EDGE/3G TD-SCDMA/4G TDD-LTE。
  7)      有效期內,數據用量累計達中港共用數據用量上限後,數據服務將會終止,無法再開通使  用。
  8)      服務不支援話音和短訊服務。
  9)   亞太電信的CDMA系統手機無法使用此卡。

https://tw.bid.yahoo.com/item/CiCiBiYi-%E5%85%A8%E7%90%83%E7%B6%B2%E5%8D%A1%E5%B0%8F%E8%88%96-%E4%B8%AD%E5%9C%8B%E7%A7%BB%E5%8B%95%E9%A6%99%E6%B8%AF4G-%E4%B8%AD%E5%9C%8B%E5%8F%8A%E9%A6%99%E6%B8%AF%E5%85%A9-100256222635
2016年9月28日 星期三
RAW12, RAW14, JPEG, TIFF影像格式
1. JPEG, TIFF:
   大小: 寬 * 高 * 1 byte (8 bits)
   顏色: 每個點擁有2的8次方 = 256 個層級,因此8bit的JPEG可以表示出256(R) * 256(G) * 256(B) = 16,777,216 = 16.77M 種顏色。

2. RAW 12:
   大小: 寬 * 高 * 1.5 byte (12 bits)
   顏色: 每個點擁有2的12次方 = 4096 個層級,因此RAW 12bit可表示出4096(R) * 4096(G) * 4096(B) = 68,719,476,736 = 68700M = 68.7G 種顏色。
3. RAW 14:
   大小: 寬 * 高 * 1.75 byte (14 bits)
   顏色: 每個點擁有2的14次方 = 16384 個級,因此14bit RAW可表示出16384(R) * 16384(G) * 16384(B) = 4,398,046,511,104 = 4398000M = 4398G = 4.398T 種顏色。

4. BMP 16
5. BMP 24
6. PPM (portable pixmap format)


7. 單眼中,每個檔案格式的大小
RAW 14-bit 未壓縮, 74.4MB, 103張
RAW 14-bit 無損壓縮, 41.3MB, 103張
RAW 14-bit 壓縮, 35.9MB, 151張
RAW 12-bit 未壓縮, 57.0MB, 133張
RAW 12-bit 無損壓縮, 32.4MB, 133張
RAW 12-bit 壓縮, 29.0MB, 182張

TIFF (RGB) -L 108.2MB, 71張
TIFF (RGB) -M 61.5MB, 126張
TIFF (RGB) -S 28.0MB, 277張

JPEG fine -L 16.3 MB, 360張
JPEG fine -M 10.4 MB, 616張
JPEG fine -S 5.2 MB, 1200張
JPEG normal -L 9.1 MB, 718張
JPEG normal -M 5.3 MB, 1200張
JPEG normal -S 2.6 MB, 2400張
JPEG basic -L 4.0 MB, 1400張
JPEG basic -M 2.7 MB, 2400張
JPEG basic -S 1.4 MB, 4800張
User space存取記憶體: devmem
1. 透過devmem,可以在userspace存取記憶體
2. 範例
2. 範例
/* * devmem2.c: Simple program to read/write from/to any location in memory. * * Copyright (C) 2000, Jan-Derk Bakker (J.D.Bakker@its.tudelft.nl) * * * This software has been developed for the LART computing board * (http://www.lart.tudelft.nl/). The development has been sponsored by * the Mobile MultiMedia Communications (http://www.mmc.tudelft.nl/) * and Ubiquitous Communications (http://www.ubicom.tudelft.nl/) * projects. * * The author can be reached at: * * Jan-Derk Bakker * Information and Communication Theory Group * Faculty of Information Technology and Systems * Delft University of Technology * P.O. Box 5031 * 2600 GA Delft * The Netherlands * * * This program is free software; you can redistribute it and/or modify * it under the terms of the GNU General Public License as published by * the Free Software Foundation; either version 2 of the License, or * (at your option) any later version. * * This program is distributed in the hope that it will be useful, * but WITHOUT ANY WARRANTY; without even the implied warranty of * MERCHANTABILITY or FITNESS FOR A PARTICULAR PURPOSE. See the * GNU General Public License for more details. * * You should have received a copy of the GNU General Public License * along with this program; if not, write to the Free Software * Foundation, Inc., 59 Temple Place, Suite 330, Boston, MA 02111-1307 USA * */ #include3. 使用方法#include #include #include #include #include #include #include #include #include #include #define FATAL do { fprintf(stderr, "Error at line %d, file %s (%d) [%s]\n", \ __LINE__, __FILE__, errno, strerror(errno)); exit(1); } while(0) #define MAP_SIZE 4096UL #define MAP_MASK (MAP_SIZE - 1) int main(int argc, char **argv) { int fd; void *map_base, *virt_addr; unsigned long read_result, writeval; off_t target; int access_type = 'w'; if(argc < 2) { fprintf(stderr, "\nUsage:\t%s { address } [ type [ data ] ]\n" "\taddress : memory address to act upon\n" "\ttype : access operation type : [b]yte, [h]alfword, [w]ord\n" "\tdata : data to be written\n\n", argv[0]); exit(1); } target = strtoul(argv[1], 0, 0); if(argc > 2) access_type = tolower(argv[2][0]); if((fd = open("/dev/mem", O_RDWR | O_SYNC)) == -1) FATAL; printf("/dev/mem opened.\n"); fflush(stdout); /* Map one page */ map_base = mmap(0, MAP_SIZE, PROT_READ | PROT_WRITE, MAP_SHARED, fd, target & ~MAP_MASK); if(map_base == (void *) -1) FATAL; printf("Memory mapped at address %p.\n", map_base); fflush(stdout); virt_addr = map_base + (target & MAP_MASK); switch(access_type) { case 'b': read_result = *((unsigned char *) virt_addr); break; case 'h': read_result = *((unsigned short *) virt_addr); break; case 'w': read_result = *((unsigned long *) virt_addr); break; default: fprintf(stderr, "Illegal data type '%c'.\n", access_type); exit(2); } printf("Value at address 0x%X (%p): 0x%X\n", target, virt_addr, read_result); fflush(stdout); if(argc > 3) { writeval = strtoul(argv[3], 0, 0); switch(access_type) { case 'b': *((unsigned char *) virt_addr) = writeval; read_result = *((unsigned char *) virt_addr); break; case 'h': *((unsigned short *) virt_addr) = writeval; read_result = *((unsigned short *) virt_addr); break; case 'w': *((unsigned long *) virt_addr) = writeval; read_result = *((unsigned long *) virt_addr); break; } printf("Written 0x%X; readback 0x%X\n", writeval, read_result); fflush(stdout); } if(munmap(map_base, MAP_SIZE) == -1) FATAL; close(fd); return 0; }
$ ./devmem

Usage:  ./devmem { address } [ type [ data ] ]
        address : memory address to act upon
        type    : access operation type : [b]yte, [h]alfword, [w]ord
        data    : data to be written
讀取記憶體
$ devmem 0x97000000 32寫入記憶體
$ devmem 0x97000000 32 0x000000004. 參考來源 http://free-electrons.com/pub/mirror/devmem2.c
2016年8月26日 星期五
Linux Screen指令 - 在一個putty終端機開啟多個shell視窗
1. screen指令用在一個終端機上開啟多個shell視窗,一般我們用putty連線到Linux主機,通常只是一個終端機開啟一個shell視窗,利用screen指令可以在一個終端機上開啟多個shell視窗,在多個shell視窗中操作,不必一直切換putty視窗,讓工作更有效率。
2. 安裝screen
ctrl + a: 按住ctrl不放再按a。 ctrl + a, c: 按住ctrl不放再按a,之後同時放開ctrl + a,再按c。
5. screen線上說明
進入screen後,按下ctrl + ?
當開啟一個putty終端機,在執行編譯程式碼的動作,編譯程式碼可能需要一段時間,這時想去做看其它程式碼,可以先將screen先detach,編譯程式碼的動作會在背景執行,直到我們再re-attach,視窗又會跳回編譯程式碼的樣子,這裡舉ping的例子來說明。
當開啟多個screen時,可以使用screen -ls列出所有screen,再使用screen -r,re-attach回指定的screen。
 11. 參考來源
http://www.gnu.org/software/screen/manual/
https://blog.gtwang.org/linux/screen-command-examples-to-manage-linux-terminals/
http://puremonkey2010.blogspot.tw/2014/12/linux-screen-unixlinux.html
2. 安裝screen
$ sudo apt-get install screen3. 啟動screen
$ screen4. 組合鍵說明
ctrl + a: 按住ctrl不放再按a。 ctrl + a, c: 按住ctrl不放再按a,之後同時放開ctrl + a,再按c。
5. screen線上說明
進入screen後,按下ctrl + ?
$ screen

$ [ctrl + ?]

break       ^B b       flow        ^F f       lockscreen  ^X x       pow_break   B          screen      ^C c       width       W
clear       C          focus       ^I         log         H          pow_detach  D          select      '          windows     ^W w
colon       :          hardcopy    h          login       L          prev        ^H ^P p ^? silence     _          wrap        ^R r
copy        ^[ [       help        ?          meta        a          quit        \          split       S          writebuf    >
detach      ^D d       history     { }        monitor     M          readbuf     <          suspend     ^Z z       xoff        ^S s
digraph     ^V         info        i          next        ^@ ^N sp n redisplay   ^L l       time        ^T t       xon         ^Q q
displays    *          kill        K k        number      N          remove      X          title       A
dumptermcap .          lastmsg     ^M m       only        Q          removebuf   =          vbell       ^G
fit         F          license     ,          other       ^A         reset       Z          version     v

^]   paste .
"    windowlist -b
-    select -
0    select 0
1    select 1
2    select 2
3    select 3
4    select 4
5    select 5
6    select 6
7    select 7
8    select 8
9    select 9
I    login on
O    login off
]    paste .
|    split -v
:kB: focus up
6. screen的detach和re-attach當開啟一個putty終端機,在執行編譯程式碼的動作,編譯程式碼可能需要一段時間,這時想去做看其它程式碼,可以先將screen先detach,編譯程式碼的動作會在背景執行,直到我們再re-attach,視窗又會跳回編譯程式碼的樣子,這裡舉ping的例子來說明。
$ screen

$ ping www.google.com.tw

$ [ctrl + d]

detach後,等到想回去時,再re-attach,如果只有一個screen,可以直接打screen -r,如果多個screen,需指定screen ID。

$ screen -r
7. 開啟多個screen
當開啟多個screen時,可以使用screen -ls列出所有screen,再使用screen -r
$ screen
$ ping www.google.com.tw
$ [ctrl + d]

$ screen
$ ping www.yahoo.com.tw
$ [ctrl + d]

$ screen -ls
$ sccreen -r <screen ID>
8. screen參數
screen -c9. 進入screen後,快速鍵: 指用指定的screen設定檔,在$HOMOE/.screenrc screen -r: re-attach最近detach的screen視窗 screen -r : re-attach指定的screen視窗 screen -ls: 列出目前所有的screen視窗 screen -L: 開啟自動記錄功能
ctrl + a, c: 建立新的screen視窗
ctrl + a, k: 關閉目前的screen視窗

ctrl + a, 0 - 9鍵: 利用數字鍵,切換指定的screen視窗
ctrl + a, n: 切換到下一個screen視窗
ctrl + a, p: 切換到上一個screen視窗
ctrl + a, w: 列出目前所有的screen視窗
ctrl + a, ": 列出目前所有的screen視窗,利用上下鍵切換screen視窗

ctrl + a, tab鍵: 切換分割視窗
ctrl + a, Q: 關閉目前分割視窗

ctrl + a, S: 將畫面分割成上下視窗
ctrl + a, |: 將畫面分割成左右視窗

ctrl + a, x: 鎖定screen視窗,需用Linux登入密碼解開

ctrl + a, H: 開啟或結果screen記錄功能

ctrl + a, C: 清資screen視窗中的內容

ctrl + a, d: detach screen視窗
ctrl + a, D: 強制detach screen視窗

ctrl + a, i: 顯示目前screen視窗的內容
ctrl + a, t: 顯示目前時間
ctrl + a, v: 顯示版本資訊
ctrl + a, ?: 顯示說明
10. 開啟左右分割視窗範例
$ screen

$ [ctrl + a, |]

$ [ctrl + a, tab鍵]

$ [ctrl + a, c]

http://www.gnu.org/software/screen/manual/
https://blog.gtwang.org/linux/screen-command-examples-to-manage-linux-terminals/
http://puremonkey2010.blogspot.tw/2014/12/linux-screen-unixlinux.html
2016年7月9日 星期六
C語言 - 使用Macro打印除錯訊息
#include <stdio.h>

#define DEBUG

#ifdef DEBUG
#define dprintf(fmt, arg...) \
do { \
        if (debug) \
                printf("DEBUG: " fmt, ##arg); \
        } while (0)
#else
#define dprintf(fmt, arg...)
#endif

int debug = 1;
int main(int argc, char *argv[])
{
        dprintf("%s\n", "hello world");

        return 0;
}
執行結果
DEBUG: hello world
2016年7月8日 星期五
C語言 - 使用Macro中#字號用法
1. #: 在Macro展開的時候會將#後面的參數替換成字串
#define dprintf(arg) printf(#arg);
調用dprintf(test)的時候會將#exp換成字串"arg"
2. 程式範例
第一個arg會被hello變數取代,hello是個指標,指向"DEBUG"字串
第二個arg會被"hello"字串取代
#define dprintf(arg) printf(#arg);
調用dprintf(test)的時候會將#exp換成字串"arg"
2. 程式範例
#include <stdio.h>

#define dprintf(arg) \
do { \

        printf("%s: %s\n", arg, #arg); \
} while (0)

int main(int argc, char *argv[])
{
        char *hello = "DEBUG"; \
        dprintf(hello);
        return 0;
}
執行結果:
DEBUG: hello
3. 上面範例Macro展開後
第一個arg會被hello變數取代,hello是個指標,指向"DEBUG"字串
第二個arg會被"hello"字串取代
dprintf(hello)
do {
        printf("%s: %s\n", hello, "hello");
} while (0)
C語言 - 使用Macro中##字號用法
1. ##: 將前後兩個的單詞拼接在一起
#define show_port(portname) show_##portname
調用show_port(mac0)展開後成為show_mac0
2. 程式範例
#define show_port(portname) show_##portname
調用show_port(mac0)展開後成為show_mac0
2. 程式範例
#include <stdio.h>

#define show_port(portname, port) \
static void show_##portname() \
{ \
        int val = 0; \
        val |= port; \
        printf("port = %s, ", #portname); \
        printf("val = 0x%04x\n", val); \
}

show_port(mac0, 0);
show_port(mac1, 1);
show_port(cpu, 2);

int main(int argc, char *argv[])
{
        show_mac0();
        show_mac1();
        show_cpu();

        return 0;
}
執行結果:
port = mac0, val = 0x0000
port = mac1, val = 0x0001
port = cpu, val = 0x0002
3. Macro展開後
show_port(mac0, 0);展開後
static void show_mac0()
{
    int val = 0;
    val |= 0;

    printf("port = %s, ", "mac0");
    printf("val = 0x%04x\n", val);
}
}
show_port(mac1, 1);展開後
static void show_mac1()
{
    int val = 0;
    val |= 1;

    printf("port = %s, ", "mac0");
    printf("val = 0x%04x\n", val);
}
}
show_port(cpu, 2);展開後
static void show_cpu()
{
    int val = 0;
    val |= 2;

    printf("port = %s, ", "cpu");
    printf("val = 0x%04x\n", val);
}
進階Kernel module的Makefile範例
obj-m := hello.o
ARCH := arm
KRNELDIR := /home/allen/Work/raspberry/linux
CROSS_COMPILE = arm-linux-gnueabihf-
CC := $(CROSS_COMPILE)gcc
LD := $(CROSS_COMPILE)ld
PWD := $(shell pwd)
all:
        make -C $(KRNELDIR) M=$(PWD) modules

.PHONY :clean
clean:
        make -C $(KRNELDIR) M=$(PWD) clean
C語言 - Big-endian和Little-endian
1. 範例程式1
https://zh.wikipedia.org/wiki/%E5%AD%97%E8%8A%82%E5%BA%8F
#include <stdio.h>

typedef union {
    long l;
    unsigned char c[4];
} Endian;

int main(int argc, char *argv[])
{
    Endian a;
    a.l = 0x12345678;

    if (a.c[0] == 0x78 && a.c[1] == 0x56 &&
        a.c[2] == 0x34 && a.c[3] == 0x12)
        printf("Little endian\n");
    else if (a.c[0] == 0x12 && a.c[1] == 0x34 &&
        a.c[2] == 0x56 && a.c[3] == 0x78)
        printf("Big endian\n");

    printf("a.l = 0x%lx\n", a.l);

    printf("%p: 0x%02x\n", &a.c[0], a.c[0]);
    printf("%p: 0x%02x\n", &a.c[1], a.c[1]);
    printf("%p: 0x%02x\n", &a.c[2], a.c[2]);
    printf("%p: 0x%02x\n", &a.c[3], a.c[3]);
    return 0;
}
執行結果:
Little endian
a.l = 0x12345678
0x7efd9634: 0x78
0x7efd9635: 0x56
0x7efd9636: 0x34
0x7efd9637: 0x12
Ex: long Data=0x12345678,寫到記憶體位址時。
- Big Endian,最高位元組在位址最低位元,最低位元組在位址最高位元,依次排列。

Address   Big-endian
-------------------------------------
0x0000    0x12
0x0001    0x34
0x0002    0x56
0x0003    0x78
-------------------------------------

- Little Endian,最低位元組在最低位元,最高位元組在最高位元,反序排列。
Address   Big-endian
-------------------------------------
0x0000    0x78
0x0001    0x56
0x0002    0x34
0x0003    0x12
-------------------------------------
2. 範例程式2
#include <stdio.h>

int main(int argc, char *argv[])
{
    unsigned int i = 0x00000001;
    char *c = (char *)&i;

    if (*c)
        printf("Little endian\n");
    else
        printf("Big endian\n");

    return 0;
}
整數宣告中,數值在記憶體中的排列
unsigned int i = 0x00000001;

Address    Big-endian    Little-endian
-------------------------------------
0x0000     0x00          0x01
0x0001     0x00          0x00
0x0002     0x00          0x00
0x0003     0x01          0x00
-------------------------------------


字元宣告中,數值在記憶體中的排列
char *c

Address    Big-endian    Little-endian
-------------------------------------
0x0000     0x00          0x01
-------------------------------------
3. 參考來源
https://zh.wikipedia.org/wiki/%E5%AD%97%E8%8A%82%E5%BA%8F
2016年7月2日 星期六
Raspberry Pi - No space left on device
1. 當安裝完Raspberry Pi官網上的映像檔後,系統上要安裝其它套件時,出現No space left on device的訊息。
2. 執行Raspberry Pi Software Configuration Tools 4. 選擇Ok,進行下一步
 5. 退出後,重新啟動系統
 6. 檢查磁碟大小
2. 執行Raspberry Pi Software Configuration Tools
$ sudo raspi-config3. 選擇 1. Expand Filesystem,延伸檔案系統大小


$ df -h
Filesystem      Size  Used Avail Use% Mounted on
/dev/root        15G  3.4G   11G  25% /
devtmpfs        459M     0  459M   0% /dev
tmpfs           463M     0  463M   0% /dev/shm
tmpfs           463M  6.3M  457M   2% /run
tmpfs           5.0M  4.0K  5.0M   1% /run/lock
tmpfs           463M     0  463M   0% /sys/fs/cgroup
/dev/mmcblk0p1   63M   21M   43M  33% /boot
tmpfs            93M     0   93M   0% /run/user/1000
2016年6月30日 星期四
Ubuntu修改主機名稱
1. 修改/etc/hostname裡的主機名稱
$ sudo vi /etc/hostname2. 修改/etc/hosts裡的主機名稱
$ sudo vi /etc/hosts3. 重新啟動
sudo reboot
Ubuntu設定固定IP
1. 修改網路設定,加入一個固定IP於介面eth1
$ sudo vi /etc/network/interfaces

auto lo
iface lo inet loopback

auto eth1
iface eth1 inet static
address 192.168.56.200
netmask 255.255.255.0
2. 重啟網路設定
$ sudo /etc/init.d/networking restart
2016年6月23日 星期四
Linux kernel - platform_driver 和 platform_device 用法
1. include/linux/platform_device.h
struct platform_device {
        const char      *name;
        int             id;
        bool            id_auto;
        struct device   dev;
        u32             num_resources;
        struct resource *resource;

        const struct platform_device_id *id_entry;
        char *driver_override; /* Driver name to force a match */

        /* MFD cell pointer */
        struct mfd_cell *mfd_cell;

        /* arch specific additions */
        struct pdev_archdata    archdata;
};

struct platform_driver {
        int (*probe)(struct platform_device *);
        int (*remove)(struct platform_device *);
        void (*shutdown)(struct platform_device *);
        int (*suspend)(struct platform_device *, pm_message_t state);
        int (*resume)(struct platform_device *);
        struct device_driver driver;
        const struct platform_device_id *id_table;
        bool prevent_deferred_probe;
};

/*
 * use a macro to avoid include chaining to get THIS_MODULE
 */
#define platform_driver_register(drv) \
        __platform_driver_register(drv, THIS_MODULE)
2. drivers/base/platform.c
**
 * __platform_driver_register - register a driver for platform-level devices
 * @drv: platform driver structure
 * @owner: owning module/driver
 */
int __platform_driver_register(struct platform_driver *drv,
                                struct module *owner)
{
        drv->driver.owner = owner;
        drv->driver.bus = &platform_bus_type;
        if (drv->probe)
                drv->driver.probe = platform_drv_probe;
        if (drv->remove)
                drv->driver.remove = platform_drv_remove;
        if (drv->shutdown)
                drv->driver.shutdown = platform_drv_shutdown;

        return driver_register(&drv->driver);
}
EXPORT_SYMBOL_GPL(__platform_driver_register);

/**
 * platform_driver_unregister - unregister a driver for platform-level devices
 * @drv: platform driver structure
 */
void platform_driver_unregister(struct platform_driver *drv)
{
        driver_unregister(&drv->driver);
}
EXPORT_SYMBOL_GPL(platform_driver_unregister);
3. drivers/base/driver.c
/**
 * driver_register - register driver with bus
 * @drv: driver to register
 *
 * We pass off most of the work to the bus_add_driver() call,
 * since most of the things we have to do deal with the bus
 * structures.
 */
int driver_register(struct device_driver *drv)
{
        int ret;
        struct device_driver *other;

        BUG_ON(!drv->bus->p);

        if ((drv->bus->probe && drv->probe) ||
            (drv->bus->remove && drv->remove) ||
            (drv->bus->shutdown && drv->shutdown))
                printk(KERN_WARNING "Driver '%s' needs updating - please use "
                        "bus_type methods\n", drv->name);

        other = driver_find(drv->name, drv->bus);
        if (other) {
                printk(KERN_ERR "Error: Driver '%s' is already registered, "
                        "aborting...\n", drv->name);
                return -EBUSY;
        }

        ret = bus_add_driver(drv);
        if (ret)
                return ret;
        ret = driver_add_groups(drv, drv->groups);
        if (ret) {
                bus_remove_driver(drv);
                return ret;
        }
        kobject_uevent(&drv->p->kobj, KOBJ_ADD);

        return ret;
}
EXPORT_SYMBOL_GPL(driver_register);

/**
 * driver_unregister - remove driver from system.
 * @drv: driver.
 *
 * Again, we pass off most of the work to the bus-level call.
 */
void driver_unregister(struct device_driver *drv)
{
        if (!drv || !drv->p) {
                WARN(1, "Unexpected driver unregister!\n");
                return;
        }
        driver_remove_groups(drv, drv->groups);
        bus_remove_driver(drv);
}
EXPORT_SYMBOL_GPL(driver_unregister);
4. 範例
#include <linux/module.h>
#include <linux/kernel.h>

#include <linux/platform_device.h>

static int sample_probe(struct platform_device *pdev)
{
        pr_alert("%s\n", __FUNCTION__);

        return 0;
}

static int sample_remove(struct platform_device *pdev)
{
        return 0;
}

#define sample_suspend NULL
#define sample_resume NULL

static const struct of_device_id sample_dt_ids[] = {
        {.compatible = "sample,timer",},
        { }
};

MODULE_DEVICE_TABLE(of, sample_dt_ids);

static struct platform_driver sample_driver = {
        .probe = sample_probe,
        .remove = sample_remove,
        .suspend = sample_suspend,
        .resume = sample_resume,
        .driver = {
                .name = "sample",
                .owner = THIS_MODULE,
                .of_match_table = sample_dt_ids,
        },
};

static int __init sample_init(void)
{
        int ret;

        ret = platform_driver_register(&sample_driver);

        return ret;
}

static void __exit sample_exit(void)
{
        platform_driver_unregister(&sample_driver);
}

module_init(sample_init);
module_exit(sample_exit);

MODULE_AUTHOR("Allen");
MODULE_DESCRIPTION("sample");
MODULE_LICENSE("GPL");
2016年5月26日 星期四
Linux kernel - platform_get_resouce 和 platform_get_irq 用法
1. 在寫platform driver的時候,有些硬體相關的資源,如記憶體位址和中斷號,需要透過platform_get_resouce去取得,核心這邊也定義了resource的結構來放這些硬體的資訊,resource的結構如下,我們通常比較關心start、end和flag的定義,
當flag為IORESOURCE_MEM時,start、end表示platform device使用的記憶體開始位址和結束位址‧
res = platform_get_resource(pdev, IORESOURCE_MEM, 0);
當flag為IORESOURCE_IRQ時,start、end表示platform device使用的中斷號的開始值和結束值‧
res = platform_get_resource(pdev, IORESOURCE_IRQ, 0);
2. include/linux/ioport.h
drivers/base/platform.c
platform设备驱动全透析 http://www.bianceng.cn/OS/Linux/201301/34910_3.htm
當flag為IORESOURCE_MEM時,start、end表示platform device使用的記憶體開始位址和結束位址‧
res = platform_get_resource(pdev, IORESOURCE_MEM, 0);
當flag為IORESOURCE_IRQ時,start、end表示platform device使用的中斷號的開始值和結束值‧
res = platform_get_resource(pdev, IORESOURCE_IRQ, 0);
2. include/linux/ioport.h
/*
 * Resources are tree-like, allowing
 * nesting etc..
 */
struct resource {
        resource_size_t start;
        resource_size_t end;
        const char *name;
        unsigned long flags;
        struct resource *parent, *sibling, *child;
};

/*
 * IO resources have these defined flags.
 */
#define IORESOURCE_BITS         0x000000ff      /* Bus-specific bits */

#define IORESOURCE_TYPE_BITS    0x00001f00      /* Resource type */
#define IORESOURCE_IO           0x00000100      /* PCI/ISA I/O ports */
#define IORESOURCE_MEM          0x00000200
#define IORESOURCE_REG          0x00000300      /* Register offsets */
#define IORESOURCE_IRQ          0x00000400
#define IORESOURCE_DMA          0x00000800
#define IORESOURCE_BUS          0x00001000

#define IORESOURCE_PREFETCH     0x00002000      /* No side effects */
#define IORESOURCE_READONLY     0x00004000
#define IORESOURCE_CACHEABLE    0x00008000
#define IORESOURCE_RANGELENGTH  0x00010000
#define IORESOURCE_SHADOWABLE   0x00020000

#define IORESOURCE_SIZEALIGN    0x00040000      /* size indicates alignment */
#define IORESOURCE_STARTALIGN   0x00080000      /* start field is alignment */

#define IORESOURCE_MEM_64       0x00100000
#define IORESOURCE_WINDOW       0x00200000      /* forwarded by bridge */
#define IORESOURCE_MUXED        0x00400000      /* Resource is software muxed */

#define IORESOURCE_EXCLUSIVE    0x08000000      /* Userland may not map this resource */
#define IORESOURCE_DISABLED     0x10000000
#define IORESOURCE_UNSET        0x20000000      /* No address assigned yet */
#define IORESOURCE_AUTO         0x40000000
#define IORESOURCE_BUSY         0x80000000      /* Driver has marked this resource busy */
3. 當resouce中定義了兩個以上的記憶體空間和一個中斷號資源
/* device tree 定義方式 */
  test: test@09100000 {
   compatible = "uio";
   reg = <0x09100000 0x10000>,
         <0x09200000 0x10000>;
   interrupts = <0 29 0x4>;
  };


/* 結構定義方式 */
static struct resource cns3xxx_usb_ehci_resources[] = {
        [0] = {
                .start = CNS3XXX_USB0_BASE,
                .end   = CNS3XXX_USB0_BASE + SZ_16M - 1,
                .flags = IORESOURCE_MEM,
        },
        [1] = {
                .start = CNS3XXX_USB1_BASE,
                .end   = CNS3XXX_USB1_BASE + SZ_16M - 1,
                .flags = IORESOURCE_MEM,
        },
        [2] = {
                .start = IRQ_CNS3XXX_USB_EHCI,
                .flags = IORESOURCE_IRQ,
        },
};
可透過platform_get_resouice第三個參數指定index
res = platform_get_resource(pdev, IORESOURCE_MEM, 0);
res = platform_get_resource(pdev, IORESOURCE_MEM, 1);
res = platform_get_resource(pdev, IORESOURCE_IRQ, 0);
4. 在使用IRQ資源,platform_get_irq封裝了platform_get_resource,也可以使用platform_get_irq(struct platform_device *dev, unsigned int num);去取得中斷號資源,
drivers/base/platform.c
/**
 * platform_get_resource - get a resource for a device
 * @dev: platform device
 * @type: resource type
 * @num: resource index
 */
struct resource *platform_get_resource(struct platform_device *dev,
                                       unsigned int type, unsigned int num)
{
        int i;

        for (i = 0; i < dev->num_resources; i++) {
                struct resource *r = &dev->resource[i];

                if (type == resource_type(r) && num-- == 0)
                        return r;
        }
        return NULL;
}
EXPORT_SYMBOL_GPL(platform_get_resource);

/**
 * platform_get_irq - get an IRQ for a device
 * @dev: platform device
 * @num: IRQ number index
 */
int platform_get_irq(struct platform_device *dev, unsigned int num)
{
#ifdef CONFIG_SPARC
        /* sparc does not have irqs represented as IORESOURCE_IRQ resources */
        if (!dev || num >= dev->archdata.num_irqs)
                return -ENXIO;
        return dev->archdata.irqs[num];
#else
        struct resource *r;
        if (IS_ENABLED(CONFIG_OF_IRQ) && dev->dev.of_node) {
                int ret;

                ret = of_irq_get(dev->dev.of_node, num);
                if (ret >= 0 || ret == -EPROBE_DEFER)
                        return ret;
        }

        r = platform_get_resource(dev, IORESOURCE_IRQ, num);
        /*
         * The resources may pass trigger flags to the irqs that need
         * to be set up. It so happens that the trigger flags for
         * IORESOURCE_BITS correspond 1-to-1 to the IRQF_TRIGGER*
         * settings.
         */
        if (r && r->flags & IORESOURCE_BITS)
                irqd_set_trigger_type(irq_get_irq_data(r->start),
                                      r->flags & IORESOURCE_BITS);

        return r ? r->start : -ENXIO;
#endif
}
5. 範例
#include <linux/module.h>
#include <linux/kernel.h>

#include <linux/platform_device.h>

struct sample_timer {
        void __iomem *base;
        void __iomem *memory;
        int irq;
};

static int sample_probe(struct platform_device *pdev)
{
        struct resource *base_res, *memory_res;
        static struct sample_timer *timer;

        pr_alert("%s\n", __FUNCTION__);

        timer = devm_kzalloc(&pdev->dev, sizeof(struct sample_timer), GFP_KERNEL);
        if (NULL == timer) {
                dev_err(&pdev->dev, "cannot allocate memory\n");
                return -ENOMEM;
        }

        base_res = platform_get_resource(pdev, IORESOURCE_MEM, 0);
        if (NULL == base_res) {
                dev_err(&pdev->dev, "cannot get IORESOUCE_MEM\n");
                return -ENOENT;
        }

        memory_res = platform_get_resource(pdev, IORESOURCE_MEM, 1);
        if (NULL == memory_res) {
                dev_err(&pdev->dev, "cannot get IORESOUCE_MEM\n");
                return -ENOENT;
        }

        timer->base = devm_ioremap_resource(&pdev->dev, base_res);
        timer->memory = devm_ioremap_resource(&pdev->dev, memory_res);

        if ((IS_ERR((const void *)(timer->base))) || (IS_ERR((const void *)(timer->memory)))) {
                dev_err(&pdev->dev, "cannot get ioremap\n");
                return -ENOENT;
        }

        timer->irq = platform_get_irq(pdev, 0);
        if (timer->irq < 0) {
                dev_err(&pdev->dev, "no irq specified\n");
                return -ENOENT;
        }

        return 0;
}

static int sample_remove(struct platform_device *pdev)
{
        return 0;
}

#define sample_suspend NULL
#define sample_resume NULL

static const struct of_device_id sample_dt_ids[] = {
        {.compatible = "sample,timer",},
        { }
};

MODULE_DEVICE_TABLE(of, sample_dt_ids);

static struct platform_driver sample_driver = {
        .probe = sample_probe,
        .remove = sample_remove,
        .suspend = sample_suspend,
        .resume = sample_resume,
        .driver = {
                .name = "sample",
                .owner = THIS_MODULE,
                .of_match_table = sample_dt_ids,
        },
};

static int __init sample_init(void)
{
        int ret;

        ret = platform_driver_register(&sample_driver);

        return ret;
}

static void __exit sample_exit(void)
{
        platform_driver_unregister(&sample_driver);
}

module_init(sample_init);
module_exit(sample_exit);

MODULE_AUTHOR("Allen");
MODULE_DESCRIPTION("sample");
MODULE_LICENSE("GPL");
6. 參考來源platform设备驱动全透析 http://www.bianceng.cn/OS/Linux/201301/34910_3.htm
2016年5月14日 星期六
Linux kernel - platform_set_drvdata 和 platform_get_drvdata 用法
1. 當裝置的platform data在probe函數中定義為區域變數,如果我們想要在其它地方使用,核心提供了這個方法,使用platform_set_drvdata()可以將data保存成裝置的私有變數,等到之後要使用時,只需要呼叫platform_get_drvdata(),就可以取出data變數。
2. platform_set_drvdata() 和 platform_get_drvdata()函數被定義在include/linux/platform_device.h
2. platform_set_drvdata() 和 platform_get_drvdata()函數被定義在include/linux/platform_device.h
static inline void *platform_get_drvdata(const struct platform_device *pdev)
{
        return dev_get_drvdata(&pdev->dev);
}

static inline void platform_set_drvdata(struct platform_device *pdev,
                                        void *data)
{
        dev_set_drvdata(&pdev->dev, data);
}
dev_get_drvdata() 和 dev_set_drvdata()函數被定義在include/linux/device.h
static inline void *dev_get_drvdata(const struct device *dev)
{
        return dev->driver_data;
}

static inline void dev_set_drvdata(struct device *dev, void *data)
{
        dev->driver_data = data;
}
3. 範例 drivers/leds/leds-gpio.c
static int gpio_led_probe(struct platform_device *pdev)
{
        struct gpio_led_platform_data *pdata = dev_get_platdata(&pdev->dev);
        struct gpio_leds_priv *priv;
        int i, ret = 0;

        if (pdata && pdata->num_leds) {
                priv = devm_kzalloc(&pdev->dev,
                                sizeof_gpio_leds_priv(pdata->num_leds),
                                        GFP_KERNEL);
                if (!priv)
                        return -ENOMEM;

                priv->num_leds = pdata->num_leds;
                for (i = 0; i < priv->num_leds; i++) {
                        ret = create_gpio_led(&pdata->leds[i],
                                              &priv->leds[i],
                                              &pdev->dev, pdata->gpio_blink_set);
                        if (ret < 0) {
                                /* On failure: unwind the led creations */
                                for (i = i - 1; i >= 0; i--)
                                        delete_gpio_led(&priv->leds[i]);
                                return ret;
                        }
                }
        } else {
                priv = gpio_leds_create(pdev);
                if (IS_ERR(priv))
                        return PTR_ERR(priv);
        }

        platform_set_drvdata(pdev, priv);

        return 0;
}

static int gpio_led_remove(struct platform_device *pdev)
{
        struct gpio_leds_priv *priv = platform_get_drvdata(pdev);
        int i;

        for (i = 0; i < priv->num_leds; i++)
                delete_gpio_led(&priv->leds[i]);

        return 0;
}

static struct platform_driver gpio_led_driver = {
        .probe          = gpio_led_probe,
        .remove         = gpio_led_remove,
        .driver         = {
                .name   = "leds-gpio",
                .of_match_table = of_gpio_leds_match,
        },
};

module_platform_driver(gpio_led_driver);

MODULE_AUTHOR("Raphael Assenat , Trent Piepho ");
MODULE_DESCRIPTION("GPIO LED driver");
MODULE_LICENSE("GPL");
MODULE_ALIAS("platform:leds-gpio");
2016年5月12日 星期四
編譯錯誤 - 需指定平台 ARCH=arm
$ make
cc1: error: unrecognized command line option "-m64"
cc1: error: unrecognized command line option "-mno-80387"
cc1: error: unrecognized command line option "-mno-fp-ret-in-387"
cc1: error: unrecognized command line option "-mno-red-zone"
cc1: error: unrecognized command line option "-mcmodel=kernel"
cc1: error: unrecognized command line option "-maccumulate-outgoing-args"
cc1: error: unrecognized command line option "-mno-sse"
cc1: error: unrecognized command line option "-mno-mmx"
cc1: error: unrecognized command line option "-mno-sse2"
cc1: error: unrecognized command line option "-mno-3dnow"
cc1: error: unrecognized command line option "-mno-avx"
cc1: error: unrecognized command line option "-fno-var-tracking-assignments"
cc1: warning: unrecognized command line option "-Wno-unused-but-set-variable"

$make ARCH=arm
2016年5月5日 星期四
Raspberry Pi - 啟用 root 帳號
1. Raspberry Pi預設帳號為pi:raspberry,如要啟用root帳號,需要執行下列命令
樹莓派(raspberry)啟用root 帳號
pi@raspberrypi: $ sudo passwd root
Enter new UNIX password: raspberry
Retype new UNIX password: raspberry
passwd: password updated successfully
2. 解鎖root帳號
pi@raspberrypi: $ sudo passwd --unlock root3. 登入root帳號
pi@raspberrypi: $ su
Password: raspberry

root@raspberrypi:
4. 參考來源
樹莓派(raspberry)啟用root 帳號
2016年5月4日 星期三
Raspberry Pi - 控制內建LED燈 PWR LED 和 ACT LED
1. Raspberry Pi有兩個內建的LED燈,一個為ACT LED,另一個是PWR LED。
 2. 查詢所有點燈模式
https://gist.github.com/taktran/1b691c08216dd30b70bf
以程式控制樹莓派 Raspberry Pi 的 ACT LED 指示燈
Linux PSP GPIO Driver Guide
Raspberry Pi と Raspberry Pi2の非互換性
OK (ACT) LED = led0
Power (PWR) LED = led1

$ cat /sys/class/leds/led0/trigger
none mmc0 timer oneshot [heartbeat] backlight gpio cpu0 cpu1 cpu2 cpu3 default-on input
3.1. 點亮LED燈
$ sudo sh -c 'echo none > /sys/class/leds/led0/trigger'
$ sudo sh -c 'echo none > /sys/class/leds/led1/trigger'
$ sudo sh -c 'echo 0 > /sys/class/leds/led0/brightness'
$ sudo sh -c 'echo 0 > /sys/class/leds/led1/brightness'
點暗LED燈
$ sudo sh -c 'echo none > /sys/class/leds/led0/trigger'
$ sudo sh -c 'echo none > /sys/class/leds/led1/trigger'
$ sudo sh -c 'echo 1 > /sys/class/leds/led0/brightness'
$ sudo sh -c 'echo 1 > /sys/class/leds/led1/brightness'
3.2. 以 SD 卡讀寫狀態觸發LED燈
$ sudo sh -c 'echo mmc0 > /sys/class/leds/led0/trigger'
$ sudo sh -c 'echo mmc0 > /sys/class/leds/led1/trigger'
3.3. 持續閃爍LED燈,delay_on為點亮時間,delay_off為點暗時間
$ sudo sh -c 'echo timer > /sys/class/leds/led0/trigger'
$ sudo sh -c 'echo 250 > /sys/class/leds/led0/delay_on'
$ sudo sh -c 'echo 250 > /sys/class/leds/led0/delay_off'

$ sudo sh -c 'echo timer > /sys/class/leds/led1/trigger'
$ sudo sh -c 'echo 2000 > /sys/class/leds/led1/delay_on'
$ sudo sh -c 'echo 2000 > /sys/class/leds/led1/delay_off'
3.4. 點亮led0,單次觸發後,持續delay_on時間後led熄滅
$ sudo sh -c 'echo oneshot > /sys/class/leds/led0/trigger'
$ sudo sh -c 'echo 3000 > /sys/class/leds/led0/delay_on'

$ sudo sh -c 'echo 1 > /sys/class/leds/led0/shot'
3.5. 心跳閃爍LED燈
$ sudo sh -c 'echo heartbeat > /sys/class/leds/led0/trigger'
$ sudo sh -c 'echo heartbeat > /sys/class/leds/led1/trigger'
3.6. 以 CPU 狀態觸發LED燈
$ sudo sh -c 'echo cpu0 > /sys/class/leds/led0/trigger'
$ sudo sh -c 'echo cpu0 > /sys/class/leds/led1/trigger'
3.7. 點亮LED燈
$ sudo sh -c 'echo default-on > /sys/class/leds/led0/trigger'
$ sudo sh -c 'echo default-on > /sys/class/leds/led1/trigger'
4. Dump GPIO相關資訊
$ mount -t debugfs debugfs /sys/kernel/debug
mount: debugfs is already mounted or /sys/kernel/debug busy
       debugfs is already mounted on /sys/kernel/debug

$ cat /sys/kernel/debug/gpio
GPIOs 0-53, platform/3f200000.gpio, pinctrl-bcm2835:
 gpio-35  (?                   ) out lo
 gpio-47  (?                   ) out lo
5. 參考來源https://gist.github.com/taktran/1b691c08216dd30b70bf
以程式控制樹莓派 Raspberry Pi 的 ACT LED 指示燈
Linux PSP GPIO Driver Guide
Raspberry Pi と Raspberry Pi2の非互換性
2016年4月28日 星期四
Raspberry Pi - 無線基地台橋接模式
1. 網路架構圖
內建的Ethernet網卡eth0,當作Raspberry Pi的WAN
http://www.edimax.com/edimax/merchandise/merchandise_detail/data/edimax/tw/wireless_adapters_n150/ew-7811un/
 3. Raspberry Pi啟動後,確認系統是否有正確抓到無線網卡
首頁 > 下載中心 > 通訊網路 ICs > Wireless LAN ICs > WLAN NIC > IEEE 802.11b/g/n Single-Chip > Software > RTL8188CUS Linux
http://www.realtek.com/downloads/downloadsView.aspx?Langid=2&PNid=21&PFid=48&Level=5&Conn=4&DownTypeID=3&GetDown=false&Downloads=true#2742

透過wget命令,下載原廠無線網卡驅動程式到Raspberry Pi
RPI-Wireless-Hotspot
Raspberry Pi 的應用 - Wi-Fi 無線基地台
Raspberry Pi 的實作 - 自動配置 IP 位址資訊的 DHCP Server
敗家學習之旅之樹莓派(Raspberry Pi) Realtek WIFI AP 架設成功心得分享
          ---------------------------------------------
         |        wlan0          |         eth0        |
       LAN PC               Raspberry Pi             Modem
  IP: 192.168.0.100             br0             IP: 192.168.0.1
  GW: 192.168.0.1
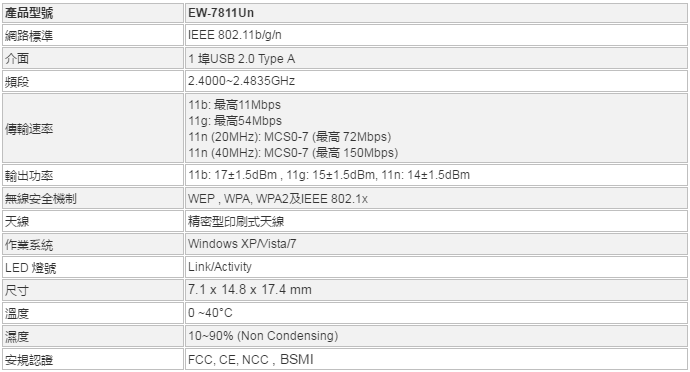
2. 準備一張Edimax EW-7811Un無線網卡wlan0,當作Raspberry Pi的LAN內建的Ethernet網卡eth0,當作Raspberry Pi的WAN
http://www.edimax.com/edimax/merchandise/merchandise_detail/data/edimax/tw/wireless_adapters_n150/ew-7811un/

$ lsusb
Bus 001 Device 005: ID 3538:0901 Power Quotient International Co., Ltd
Bus 001 Device 004: ID 7392:7811 Edimax Technology Co., Ltd EW-7811Un 802.11n Wireless Adapter [Realtek RTL8188CUS]
Bus 001 Device 003: ID 0424:ec00 Standard Microsystems Corp. SMSC9512/9514 Fast Ethernet Adapter
Bus 001 Device 002: ID 0424:9514 Standard Microsystems Corp.
Bus 001 Device 001: ID 1d6b:0002 Linux Foundation 2.0 root hub
4. 安裝hostapd套件,讓無線網卡模擬成Soft AP
$ sudo apt-get install hostapd由於內建的hostapd不支援此張網卡,需要先移除hostpad程式,但保留相關的設定檔
$ sudo apt-get remove hostapd5. Edimax EW-7811Un的驅動程式,需要從Realtek官網下載,請選擇RTL8188CUS的Linux版本
首頁 > 下載中心 > 通訊網路 ICs > Wireless LAN ICs > WLAN NIC > IEEE 802.11b/g/n Single-Chip > Software > RTL8188CUS Linux
http://www.realtek.com/downloads/downloadsView.aspx?Langid=2&PNid=21&PFid=48&Level=5&Conn=4&DownTypeID=3&GetDown=false&Downloads=true#2742

透過wget命令,下載原廠無線網卡驅動程式到Raspberry Pi
$ wget http://12244.wpc.azureedge.net/8012244/drivers/rtdrivers/cn/wlan/0001-RTL8188C_8192C_USB_linux_v4.0.2_9000.20130911.zip6. 安裝hostapd程式
$ unzip 0001-RTL8188C_8192C_USB_linux_v4.0.2_9000.20130911.zip

$ cd RTL8188C_8192C_USB_linux_v4.0.2_9000.20130911/wpa_supplicant_hostapd/

$ tar -zxvf wpa_supplicant_hostapd-0.8_rtw_r7475.20130812.tar.gz

$ cd wpa_supplicant_hostapd-0.8_rtw_r7475.20130812/hostapd

$ make clean && make && sudo make install
將hostapd相關檔案複製到/usr/bin
$ sudo cp /usr/local/bin/hostapd* /usr/sbin7. 安裝wireless工具
$ cd ../../../wireless_tools

$ tar -zxvf wireless_tools.30.rtl.tar.gz

$ cd wireless_tools.30.rtl

$ make clean && make && sudo make install
8. 建立hostapd設定檔
driver: 無線網卡的驅動程式
ssid: 基地台名稱。
channel: 無線通訊的頻道,從1到11
wpa: 無線網路加密協定,1是WPA,2是WPA2
wpa_passphrase: 無線基地台的密碼。
$ sudo vi /etc/hostapd/hostapd.conf

interface=wlan0
driver=rtl871xdrv
bridge=br0
ssid=pi
channel=6
hw_mode=g
ieee80211n=1
wmm_enabled=1
wpa=2
wpa_passphrase=raspberry
wpa_key_mgmt=WPA-PSK
wpa_pairwise=TKIP
rsn_pairwise=CCMP
auth_algs=1
macaddr_acl=0
測試hosapd設定檔
$ sudo hostapd -dd /etc/hostapd/hostapd.conf如沒有出現錯誤,按Ctrl+C停止hostapd,編輯hostapd服務設定檔
$ sudo vi /etc/default/hostapd

# Defaults for hostapd initscript
#
# See /usr/share/doc/hostapd/README.Debian for information about alternative
# methods of managing hostapd.
#
# Uncomment and set DAEMON_CONF to the absolute path of a hostapd configuration
# file and hostapd will be started during system boot. An example configuration
# file can be found at /usr/share/doc/hostapd/examples/hostapd.conf.gz
#
#DAEMON_CONF=""
DAEMON_CONF="/etc/hostapd/hostapd.conf"

# Additional daemon options to be appended to hostapd command:-
#       -d   show more debug messages (-dd for even more)
#       -K   include key data in debug messages
#       -t   include timestamps in some debug messages
#
# Note that -B (daemon mode) and -P (pidfile) options are automatically
# configured by the init.d script and must not be added to DAEMON_OPTS.
#
#DAEMON_OPTS=""
啟動hostapd服務
$ sudo service hostapd restart開機時自動啟動hostapd服務
$ sudo update-rc.d hostapd defaults9. 安裝網路橋接功能套件
$ sudo apt-get -y install bridge-utils10. 修改無線網卡的設定值,加入橋接功能
$ sudo vi /etc/network/interfaces

# interfaces(5) file used by ifup(8) and ifdown(8)

# Please note that this file is written to be used with dhcpcd
# For static IP, consult /etc/dhcpcd.conf and 'man dhcpcd.conf'

# Include files from /etc/network/interfaces.d:
source-directory /etc/network/interfaces.d

auto lo
iface lo inet loopback

iface eth0 inet manual

#allow-hotplug wlan0
#iface wlan0 inet manual
#    wpa-conf /etc/wpa_supplicant/wpa_supplicant.conf

#allow-hotplug wlan1
#iface wlan1 inet manual
#    wpa-conf /etc/wpa_supplicant/wpa_supplicant.conf

auto br0
iface br0 inet dhcp
bridge_ports eth0 wlan0
11. 重新啟動
$ sudo reboot12. 重新啟動後,可下brctl橋接命令,確認橋接模式
$ brctl show
bridge name     bridge id               STP enabled     interfaces
br0             8000.74da3855819b       no              eth0
                                                        wlan0
13. 參考來源RPI-Wireless-Hotspot
Raspberry Pi 的應用 - Wi-Fi 無線基地台
Raspberry Pi 的實作 - 自動配置 IP 位址資訊的 DHCP Server
敗家學習之旅之樹莓派(Raspberry Pi) Realtek WIFI AP 架設成功心得分享
2016年4月22日 星期五
Raspberry Pi - 無線基地台路由模式 hostapd + dnsmasq
1. 網路架構圖
內建的Ethernet網卡eth0,當作Raspberry Pi的WAN
http://www.edimax.com/edimax/merchandise/merchandise_detail/data/edimax/tw/wireless_adapters_n150/ew-7811un/
3. Raspberry Pi啟動後,確認系統是否有正確抓到無線網卡
首頁 > 下載中心 > 通訊網路 ICs > Wireless LAN ICs > WLAN NIC > IEEE 802.11b/g/n Single-Chip > Software > RTL8188CUS Linux
http://www.realtek.com/downloads/downloadsView.aspx?Langid=2&PNid=21&PFid=48&Level=5&Conn=4&DownTypeID=3&GetDown=false&Downloads=true#2742
透過wget命令,下載原廠無線網卡驅動程式到Raspberry Pi
RPI-Wireless-Hotspot
Raspberry Pi 的應用 - Wi-Fi 無線基地台
Raspberry Pi 的實作 - 自動配置 IP 位址資訊的 DHCP Server
敗家學習之旅之樹莓派(Raspberry Pi) Realtek WIFI AP 架設成功心得分享
          ---------------------------------------------
         |        wlan0          |         eth0        |
       LAN PC               Raspberry Pi             Modem
  IP: 192.168.1.100    WAN eth0:  192.168.0.100   IP: 192.168.0.1
  GW: 192.168.1.1      LAN wlan0: 192.168.1.1
2. 準備一張Edimax EW-7811Un無線網卡wlan0,當作Raspberry Pi的LAN內建的Ethernet網卡eth0,當作Raspberry Pi的WAN
http://www.edimax.com/edimax/merchandise/merchandise_detail/data/edimax/tw/wireless_adapters_n150/ew-7811un/
$ lsusb
Bus 001 Device 005: ID 3538:0901 Power Quotient International Co., Ltd
Bus 001 Device 004: ID 7392:7811 Edimax Technology Co., Ltd EW-7811Un 802.11n Wireless Adapter [Realtek RTL8188CUS]
Bus 001 Device 003: ID 0424:ec00 Standard Microsystems Corp. SMSC9512/9514 Fast Ethernet Adapter
Bus 001 Device 002: ID 0424:9514 Standard Microsystems Corp.
Bus 001 Device 001: ID 1d6b:0002 Linux Foundation 2.0 root hub
4. 安裝hostapd套件,讓無線網卡模擬成Soft AP
$ sudo apt-get install hostapd由於內建的hostapd不支援此張網卡,需要先移除hostpad程式,但保留相關的設定檔
$ sudo apt-get remove hostapd5. Edimax EW-7811Un的驅動程式,需要從Realtek官網下載,請選擇RTL8188CUS的Linux版本
首頁 > 下載中心 > 通訊網路 ICs > Wireless LAN ICs > WLAN NIC > IEEE 802.11b/g/n Single-Chip > Software > RTL8188CUS Linux
http://www.realtek.com/downloads/downloadsView.aspx?Langid=2&PNid=21&PFid=48&Level=5&Conn=4&DownTypeID=3&GetDown=false&Downloads=true#2742
透過wget命令,下載原廠無線網卡驅動程式到Raspberry Pi
$ wget http://12244.wpc.azureedge.net/8012244/drivers/rtdrivers/cn/wlan/0001-RTL8188C_8192C_USB_linux_v4.0.2_9000.20130911.zip6. 安裝hostapd程式
$ unzip 0001-RTL8188C_8192C_USB_linux_v4.0.2_9000.20130911.zip

$ cd RTL8188C_8192C_USB_linux_v4.0.2_9000.20130911/wpa_supplicant_hostapd/

$ tar -zxvf wpa_supplicant_hostapd-0.8_rtw_r7475.20130812.tar.gz

$ cd wpa_supplicant_hostapd-0.8_rtw_r7475.20130812/hostapd

$ make clean && make && sudo make install
將hostapd相關檔案複製到/usr/bin
$ sudo cp /usr/local/bin/hostapd* /usr/sbin7. 安裝wireless工具
$ cd ../../../wireless_tools

$ tar -zxvf wireless_tools.30.rtl.tar.gz

$ cd wireless_tools.30.rtl

$ make clean && make && sudo make install
8. 建立hostapd設定檔
driver: 無線網卡的驅動程式
ssid: 基地台名稱。
channel: 無線通訊的頻道,從1到11
wpa: 無線網路加密協定,1是WPA,2是WPA2
wpa_passphrase: 無線基地台的密碼。
$ sudo vi /etc/hostapd/hostapd.conf

interface=wlan0
driver=rtl871xdrv
bridge=br0
ssid=pi
channel=6
hw_mode=g
ieee80211n=1
wmm_enabled=1
wpa=2
wpa_passphrase=raspberry
wpa_key_mgmt=WPA-PSK
wpa_pairwise=TKIP
rsn_pairwise=CCMP
auth_algs=1
macaddr_acl=0
測試hosapd設定檔
$ sudo hostapd -dd /etc/hostapd/hostapd.conf如沒有出現錯誤,按Ctrl+C停止hostapd,編輯hostapd服務設定檔
$ sudo vi /etc/default/hostapd

# Defaults for hostapd initscript
#
# See /usr/share/doc/hostapd/README.Debian for information about alternative
# methods of managing hostapd.
#
# Uncomment and set DAEMON_CONF to the absolute path of a hostapd configuration
# file and hostapd will be started during system boot. An example configuration
# file can be found at /usr/share/doc/hostapd/examples/hostapd.conf.gz
#
#DAEMON_CONF=""
DAEMON_CONF="/etc/hostapd/hostapd.conf"

# Additional daemon options to be appended to hostapd command:-
#       -d   show more debug messages (-dd for even more)
#       -K   include key data in debug messages
#       -t   include timestamps in some debug messages
#
# Note that -B (daemon mode) and -P (pidfile) options are automatically
# configured by the init.d script and must not be added to DAEMON_OPTS.
#
#DAEMON_OPTS=""
啟動hostapd服務
$ sudo service hostapd restart開機時自動啟動hostapd服務
$ sudo update-rc.d hostapd defaults9. 修改無線網路卡的設定值,設定一個指定的靜態 IP 位址
$ sudo vi /etc/network/interfaces

# interfaces(5) file used by ifup(8) and ifdown(8)

# Please note that this file is written to be used with dhcpcd
# For static IP, consult /etc/dhcpcd.conf and 'man dhcpcd.conf'

# Include files from /etc/network/interfaces.d:
source-directory /etc/network/interfaces.d

auto lo
iface lo inet loopback

iface eth0 inet manual

allow-hotplug wlan0
iface wlan0 inet static
address 192.168.1.1
netmask 255.255.255.0
10. 路由模式需要在Raspberry Pi架設dnsmasq
$ sudo apt-get -y install dnsmasq修改dnsmasq設定檔
$ sudo vi /etc/dnsmasq.conf

# If you want dnsmasq to listen for DHCP and DNS requests only on
# specified interfaces (and the loopback) give the name of the
# interface (eg eth0) here.
# Repeat the line for more than one interface.
#interface=
interface=wlan0


# Uncomment this to enable the integrated DHCP server, you need
# to supply the range of addresses available for lease and optionally
# a lease time. If you have more than one network, you will need to
# repeat this for each network on which you want to supply DHCP
# service.
#dhcp-range=192.168.0.50,192.168.0.150,12h
dhcp-range=192.168.1.100,192.168.1.254,12h
如果想要開機時使用dnsmasq設定,需要修改設定
$ sudo vi /etc/default/dnsmasq

#DOMAIN_SUFFIX=`dnsdomainname`
DNSMASQ_OPTS="--conf-file=/etc/dnsmasq.conf"


# By default search this drop directory for configuration options.
# Libvirt leaves a file here to make the system dnsmasq play nice.
# Comment out this line if you don't want this. The dpkg-* are file
# endings which cause dnsmasq to skip that file. This avoids pulling
# in backups made by dpkg.
#CONFIG_DIR=/etc/dnsmasq.d,.dpkg-dist,.dpkg-old,.dpkg-new
啟動dnsmasq服務
$ sudo service dnsmasq restart開機時自動啟動dnsmasq服務
$ sudo update-rc.d dnsmasq defaults11. 啟動IP Forwarding的功能,將net.ipv4.ip_forward=1拿掉註解
$ sudo vi /etc/sysctl.conf

# Uncomment the next line to enable packet forwarding for IPv4
net.ipv4.ip_forward=1
12. 啟用iptables NAT功能
$ sudo iptables -F
$ sudo iptables -F -t nat
$ sudo iptables -t nat -A POSTROUTING -o eth0 -j MASQUERADE
$ sudo iptables -A FORWARD -i eth0 -o wlan0 -m state --state RELATED,ESTABLISHED -j ACCEPT
$ sudo iptables -A FORWARD -i wlan0 -o eth0 -j ACCEPT
儲存目前iptables設定值
$ sudo bash -c 'iptables-save > /etc/network/iptables'
$ sudo iptables-restore < /etc/network/iptables
設定開機時,讓iptables的規則自動被載入
$ sudo vi /etc/rc.local

#!/bin/sh -e
#
# rc.local
#
# This script is executed at the end of each multiuser runlevel.
# Make sure that the script will "exit 0" on success or any other
# value on error.
#
# In order to enable or disable this script just change the execution
# bits.
#
# By default this script does nothing.

# Print the IP address
_IP=$(hostname -I) || true
if [ "$_IP" ]; then
  printf "My IP address is %s\n" "$_IP"
fi

sudo iptables-restore < /etc/network/iptables

exit 0
13. 重新啟動
$ sudo reboot14. 參考來源
RPI-Wireless-Hotspot
Raspberry Pi 的應用 - Wi-Fi 無線基地台
Raspberry Pi 的實作 - 自動配置 IP 位址資訊的 DHCP Server
敗家學習之旅之樹莓派(Raspberry Pi) Realtek WIFI AP 架設成功心得分享
2016年4月21日 星期四
新加坡四日遊 - 行程規劃、住宿、旅遊票卷
行程表 --------------------------------------------------------------------- 10/8 (四) 01:05 - 05:50 桃園機場 → 樟宜機場 到新加坡首先要解決的是交通與上網的問題 - 辦SingTel hi! Tourist SIM $15,可到以下三個地方辦,便利商店是最方便,辦的時候記得指定SD, micro SD或nano SD卡。 1. RHB Bank Currency Exchange Counters 2. Changi Recommends Counters 3. 便利商店 - 辦易通卡(EZ - Link Card),建議旅人從樟宜機場第二航廈到達 SMRT 地鐵站後,就先在服務處購買一張 EZ-Link Card。 早餐 - Toast Box 吐司工坊 24 hours [Changi Airport T3] - Haji Lane蘇丹回教堂 [EW12,Bugis 武吉士] - 亞拉街(Arab St.) [EW12,Bugis 武吉士] 蘇丹回教堂後面 * 唐城坊 天宇旅行社,買優惠票 10:00~20:00 [NE4,China Town 牛車水 E出路] 如果機場沒辦法辦Sintel,可以到唐城坊辦 - 牛車水郵局買郵票,在唐城坊附近 [NE4,China Town 牛車水 E出路] 午餐 - Maxwell Food Centre麥士威熟食中心 [EW15,Tanjong Pagar 、NE4,Chinatown 牛車水] 天海南雞飯11:00~17:00 松發肉骨茶 金華魚片米粉 老伴豆花 真真粥品 薏米水 - 馬里安興都廟 [NE4,China Town 牛車水] - 亞坤咖椰吐司 總店 [NE4,China Town 牛車水] - 史密斯街 寶塔街 [NE4,China Town 牛車水] - 林志源肉乾 [NE4,China Town 牛車水] - 味香園 [NE4,China Town 牛車水] - 佛牙寺 [NE4,Chinatown 牛車水] - 克拉碼頭 (末班22:30) [NE5,克拉碼頭] - 慕達發中心 [NE8,Farrer Park 花拉公園] 10/9 (五) 早餐 - Zam Zam 印度烤餅 [EW12,Bugis 武吉士] - 哈芝巷喝咖啡 [EW12,Bugis 武吉士] - 小印度拱廊 [NE7,Little India小印度、NE8,Farrer Park 花拉公園] - 阿都卡夫回教堂 (09:00~13:00/ 14:30~18:30) [NE7,Little India 小印度] 午餐 - 竹腳市場 囉惹 黃薑飯 印度煎餠 [NE7,Little India 小印度] - 實龍崗路 [NE7,Little India 小印度] - 烏節路 [NS22,Orcharad 烏節] - 夜間動物園 19:30~24:00 [NS16,Ang Mo Kio 宏茂橋站] 走C出口轉138公車 30~40分 http://www.nightsafari.com.sg/ 夜間動物表演: 晚上7.30、8.30、9.30以及10.30 *仅限星期五、星期六以及公共假期前夕 婆羅洲土著表演: 傍晚6.45、晚上8.00、9.00以及10.00 *仅限星期五、星期六以及公共假期前夕。 遊覽車探險體驗: 40分 10/10 (六) 早餐 - Luge斜坡渦車 Skyride空中吊車 [NE1,Harbour Front 港灣站 → 聖淘沙 Imbiah Station 英比奧捷運站] - 海洋館 [NE1,Harbour Front 港灣站 → 聖淘沙 Imbiah Station 英比奧捷運站] 午餐 - 聖安德烈教堂 (EW13/NS25,City Hall 政府大廈) - 萊佛士商場 [EW14/NS26,Raffles Place 萊佛士坊] - 老巴剎沙嗲 [EW14/NS26,Raffles Place 萊佛士坊] - Cavenagh Bridge加文納橋 [EW14/NS26,Raffles Place 萊佛士坊] - Gardens by the bay 濱海灣花園 [CE1,Bayfront 海灣舫] - Singapore Flyer新加坡摩天觀景輪 before 18:00 [CE1,Bayfront 海灣舫] - 魚尾獅公園 燈光秀 8:00PM、9:30PM [EW14/NS26,Raffles Place 萊佛士坊] 10/11 (日) - 結霜橋叻沙 09:00~18:00 [NE8,Farrer Park 花拉公園] - Lady M 甜點 [EW14/NS26,Raffles Place 萊佛士坊] 10/12 (一) 00:45 - 05:20 樟宜機場 → 桃園機場 新加坡天氣 --------------------------------------------------------------------- 匯率:1:24 氣候::年均低溫24度,高溫31度 (短袖、短褲、雨傘) 簽證:免簽30天 桃園機場-->新加坡:約四個半小時 電器插頭:三孔式 (220-240V) 新加坡交通 --------------------------------------------------------------------- 1. 易通卡 (EZ - Link Card) http://home.ezlink.com.sg/get-your-ez-link-card/where-the-cards-are-sold EZ - Link 卡儲值有效期為 5 年,可在各大地鐵站的 Transitlink Ticket Office 和 Passenger Service Centre 購買, 建議旅人從樟宜機場第二航廈到達 SMRT 地鐵站後,就先在服務處購買一張 EZ-Link Card,費用 SD 12 元, 其中包括可退的儲值金 SD 7 元及不可退的製卡工本費 SD 5 元。 PS. 搭乘地鐵最低餘額須大於 SD 3 元,每次加值最低須加值 SD 10 元。SMRT 營業時間 週一至周六 首班車 05:16 末班車 23:30 /週日及例假日 首班車 05:35 末班車 23:30。 從樟宜機場站(Changi Airport)開往丹那美拉站(Tanah Merah) 週一至周六 首班車 05:31 末班車 00:06 /週日及假日 首班車 05:59 末班車 00:06 從丹那美拉站(Tanah Merah)開往樟宜機場站(Changi Airport) 週一至周六 首班車 05:20 末班車 23:50 /週日及假日 首班車 05:47 末班車 23:50 【東行】2014年新加坡自由行--新加坡EZ-LINK儲值教學、交通方式介紹 新加坡上網 --------------------------------------------------------------------- 1. SingTel 樟宜機場 or 唐城坊 新加坡旅遊超便宜預付卡手機3G/4G行動上網 Singtel hi!Tourist SIM: Packed with everything you need. hi! Tourist SIM (可以開熱點分享,也可以放到Wifi分享器供同行者使用,連線速度看別人寫的經驗大於3G) 15元:5天使用期,可享有500分鐘當地通話,100則SMS訊息,30分鐘國際電話,100GB流量,有Normal、Micro及Nano三種尺寸。可以再儲值1天5新幣延長使用天數,但是通話時間、簡訊、上網流量不會增加。新加坡住宿 --------------------------------------------------------------------- 1. Central 65 hotel [EW12,Bugis 武吉士] 1km,12分 Address: 134 Jalan Besar Singapore 208852 Front Desk Operation: 7:00am – 11:00pm Breakfast: 7:30am – 10:30am TEL: (+65) 6298 0015 http://central65hostel.com/ 2. Hotel ibis Singapore on Bencoolen [EW12,Bugis 武吉士] 500m,7分 Address: 170 BENCOOLEN STREET 189657 - SINGAPORE TEL: (+65)65932888 http://www.ibis.com/gb/hotel-6657-ibis-singapore-on-bencoolen/index.shtml 票價優惠 - 天宇旅行社 --------------------------------------------------------------------- 唐城坊 天宇旅行社10:00~20:00 [NE4,China Town 牛車水 E出路] [新加坡] 便宜票券哪裡買??到天宇旅行社吧!! 新加坡地鐵站和聖淘沙地圖 ---------------------------------------------------------------------


Raspberry Pi - 無線基地台路由模式 hostapd + udhcpd
1. 網路架構圖
內建的Ethernet網卡eth0,當作Raspberry Pi的WAN
http://www.edimax.com/edimax/merchandise/merchandise_detail/data/edimax/tw/wireless_adapters_n150/ew-7811un/
3. Raspberry Pi啟動後,確認系統是否有正確抓到無線網卡
首頁 > 下載中心 > 通訊網路 ICs > Wireless LAN ICs > WLAN NIC > IEEE 802.11b/g/n Single-Chip > Software > RTL8188CUS Linux
http://www.realtek.com/downloads/downloadsView.aspx?Langid=2&PNid=21&PFid=48&Level=5&Conn=4&DownTypeID=3&GetDown=false&Downloads=true#2742
透過wget命令,下載原廠無線網卡驅動程式到Raspberry Pi
RPI-Wireless-Hotspot
Raspberry Pi 的應用 - Wi-Fi 無線基地台
Raspberry Pi 的實作 - 自動配置 IP 位址資訊的 DHCP Server
敗家學習之旅之樹莓派(Raspberry Pi) Realtek WIFI AP 架設成功心得分享
          ---------------------------------------------
         |        wlan0          |         eth0        |
       LAN PC               Raspberry Pi             Modem
  IP: 192.168.1.100    WAN eth0:  192.168.0.100   IP: 192.168.0.1
  GW: 192.168.1.1      LAN wlan0: 192.168.1.1
2. 準備一張Edimax EW-7811Un無線網卡wlan0,當作Raspberry Pi的LAN內建的Ethernet網卡eth0,當作Raspberry Pi的WAN
http://www.edimax.com/edimax/merchandise/merchandise_detail/data/edimax/tw/wireless_adapters_n150/ew-7811un/
$ lsusb
Bus 001 Device 005: ID 3538:0901 Power Quotient International Co., Ltd
Bus 001 Device 004: ID 7392:7811 Edimax Technology Co., Ltd EW-7811Un 802.11n Wireless Adapter [Realtek RTL8188CUS]
Bus 001 Device 003: ID 0424:ec00 Standard Microsystems Corp. SMSC9512/9514 Fast Ethernet Adapter
Bus 001 Device 002: ID 0424:9514 Standard Microsystems Corp.
Bus 001 Device 001: ID 1d6b:0002 Linux Foundation 2.0 root hub
4. 安裝hostapd套件,讓無線網卡模擬成Soft AP
$ sudo apt-get install hostapd由於內建的hostapd不支援此張網卡,需要先移除hostpad程式,但保留相關的設定檔
$ sudo apt-get remove hostapd5. Edimax EW-7811Un的驅動程式,需要從Realtek官網下載,請選擇RTL8188CUS的Linux版本
首頁 > 下載中心 > 通訊網路 ICs > Wireless LAN ICs > WLAN NIC > IEEE 802.11b/g/n Single-Chip > Software > RTL8188CUS Linux
http://www.realtek.com/downloads/downloadsView.aspx?Langid=2&PNid=21&PFid=48&Level=5&Conn=4&DownTypeID=3&GetDown=false&Downloads=true#2742
透過wget命令,下載原廠無線網卡驅動程式到Raspberry Pi
$ wget http://12244.wpc.azureedge.net/8012244/drivers/rtdrivers/cn/wlan/0001-RTL8188C_8192C_USB_linux_v4.0.2_9000.20130911.zip6. 安裝hostapd程式
$ unzip 0001-RTL8188C_8192C_USB_linux_v4.0.2_9000.20130911.zip

$ cd RTL8188C_8192C_USB_linux_v4.0.2_9000.20130911/wpa_supplicant_hostapd/

$ tar -zxvf wpa_supplicant_hostapd-0.8_rtw_r7475.20130812.tar.gz

$ cd wpa_supplicant_hostapd-0.8_rtw_r7475.20130812/hostapd

$ make clean && make && sudo make install
將hostapd相關檔案複製到/usr/bin
$ sudo cp /usr/local/bin/hostapd* /usr/sbin7. 安裝wireless工具
$ cd ../../../wireless_tools

$ tar -zxvf wireless_tools.30.rtl.tar.gz

$ cd wireless_tools.30.rtl

$ make clean && make && sudo make install
8. 建立hostapd設定檔
driver: 無線網卡的驅動程式
ssid: 基地台名稱。
channel: 無線通訊的頻道,從1到11
wpa: 無線網路加密協定,1是WPA,2是WPA2
wpa_passphrase: 無線基地台的密碼。
$ sudo vi /etc/hostapd/hostapd.conf

interface=wlan0
driver=rtl871xdrv
bridge=br0
ssid=pi
channel=6
hw_mode=g
ieee80211n=1
wmm_enabled=1
wpa=2
wpa_passphrase=raspberry
wpa_key_mgmt=WPA-PSK
wpa_pairwise=TKIP
rsn_pairwise=CCMP
auth_algs=1
macaddr_acl=0
測試hosapd設定檔
$ sudo hostapd -dd /etc/hostapd/hostapd.conf如沒有出現錯誤,按Ctrl+C停止hostapd,編輯hostapd服務設定檔
$ sudo vi /etc/default/hostapd

# Defaults for hostapd initscript
#
# See /usr/share/doc/hostapd/README.Debian for information about alternative
# methods of managing hostapd.
#
# Uncomment and set DAEMON_CONF to the absolute path of a hostapd configuration
# file and hostapd will be started during system boot. An example configuration
# file can be found at /usr/share/doc/hostapd/examples/hostapd.conf.gz
#
#DAEMON_CONF=""
DAEMON_CONF="/etc/hostapd/hostapd.conf"

# Additional daemon options to be appended to hostapd command:-
#       -d   show more debug messages (-dd for even more)
#       -K   include key data in debug messages
#       -t   include timestamps in some debug messages
#
# Note that -B (daemon mode) and -P (pidfile) options are automatically
# configured by the init.d script and must not be added to DAEMON_OPTS.
#
#DAEMON_OPTS=""
啟動hostapd服務
$ sudo service hostapd restart開機時自動啟動hostapd服務
$ sudo update-rc.d hostapd defaults9. 修改無線網路卡的設定值,設定一個指定的靜態 IP 位址
$ sudo vi /etc/network/interfaces

# interfaces(5) file used by ifup(8) and ifdown(8)

# Please note that this file is written to be used with dhcpcd
# For static IP, consult /etc/dhcpcd.conf and 'man dhcpcd.conf'

# Include files from /etc/network/interfaces.d:
source-directory /etc/network/interfaces.d

auto lo
iface lo inet loopback

iface eth0 inet manual

allow-hotplug wlan0
iface wlan0 inet static
address 192.168.1.1
netmask 255.255.255.0
10. 路由模式需要在Raspberry Pi架設DHCP Server
$ sudo apt-get -y install udhcpd將DHCPD_ENABLED="no"加上註解
$ sudo vi /etc/default/udhcpd

# Comment the following line to enable
#DHCPD_ENABLED="no"

# Options to pass to busybox' udhcpd.
#
# -S    Log to syslog
# -f    run in foreground

DHCPD_OPTS="-S"
修改DHCP Server設定檔
$ sudo vi /etc/udhcpd.conf

# The start and end of the IP lease block

start           192.168.1.100   #default: 192.168.0.20
end             192.168.1.254   #default: 192.168.0.254

# The interface that udhcpd will use

interface       wlan0           #default: eth0


#Examles
opt     dns     8.8.8.8 192.168.1.1
option  subnet  255.255.255.0
opt     router  192.168.1.1
#opt    wins    192.168.10.10
#option dns     129.219.13.81   # appened to above DNS servers for a total of 3
#option domain  local
option  lease   864000          # 10 days of seconds
啟動DHCP Server服務
$ sudo service udhcpd restart開機時自動啟動DHCP Server服務
$ sudo update-rc.d udhcpd defaults11. 啟動IP Forwarding的功能,將net.ipv4.ip_forward=1拿掉註解
$ sudo vi /etc/sysctl.conf

# Uncomment the next line to enable packet forwarding for IPv4
net.ipv4.ip_forward=1
12. 啟用iptables NAT功能
$ sudo iptables -F
$ sudo iptables -F -t nat
$ sudo iptables -t nat -A POSTROUTING -o eth0 -j MASQUERADE
$ sudo iptables -A FORWARD -i eth0 -o wlan0 -m state --state RELATED,ESTABLISHED -j ACCEPT
$ sudo iptables -A FORWARD -i wlan0 -o eth0 -j ACCEPT
儲存目前iptables設定值
$ sudo bash -c 'iptables-save > /etc/network/iptables'
$ sudo iptables-restore < /etc/network/iptables
設定開機時,讓iptables的規則自動被載入
$ sudo vi /etc/rc.local

#!/bin/sh -e
#
# rc.local
#
# This script is executed at the end of each multiuser runlevel.
# Make sure that the script will "exit 0" on success or any other
# value on error.
#
# In order to enable or disable this script just change the execution
# bits.
#
# By default this script does nothing.

# Print the IP address
_IP=$(hostname -I) || true
if [ "$_IP" ]; then
  printf "My IP address is %s\n" "$_IP"
fi

sudo iptables-restore < /etc/network/iptables

exit 0
13. 重新啟動
$ sudo reboot14. 參考來源
RPI-Wireless-Hotspot
Raspberry Pi 的應用 - Wi-Fi 無線基地台
Raspberry Pi 的實作 - 自動配置 IP 位址資訊的 DHCP Server
敗家學習之旅之樹莓派(Raspberry Pi) Realtek WIFI AP 架設成功心得分享
2016年4月20日 星期三
Raspberry Pi - 播放MP3音效檔
1. 在Raspberry Pi播放MP3音效檔並不難,內建就有一個音效播放程式omxplayer,首先,先取得一個mp3音效檔
https://www.raspberrypi.org/documentation/usage/audio/
$ wget https://goo.gl/XJuOUW -O example.mp3 --no-check-certificate2. 透過headphone jack介面播放測試音效
$ omxplayer -o local example.mp3
Audio codec mp3 channels 1 samplerate 11025 bitspersample 16
Subtitle count: 0, state: off, index: 1, delay: 0
如果想要透過HDMI介面播放測試音效,可以藉由參數來設定
$ omxplayer -o hdmi example.mp3
Audio codec mp3 channels 1 samplerate 11025 bitspersample 16
Subtitle count: 0, state: off, index: 1, delay: 0
3. 參考來源
https://www.raspberrypi.org/documentation/usage/audio/
Raspberry Pi - Hello audio 音效測試
1. Raspberry Pi提供一些Demo程式,為了測試音效的部份,需要進入hello_pi目錄
https://www.raspberrypi.org/documentation/usage/demos/README.md
https://www.raspberrypi.org/documentation/usage/demos/hello-audio.md
$ cd /opt/vc/src/hello_pi2. 編譯Demo程式
./rebuild.sh3. 進入Audo demo程式的目錄
$ cd hello_audio

$ ls
audio.c  audioplay.h  hello_audio.bin  Makefile  sinewave.c
4. 透過headphone jack介面播放測試音效
$ ./hello_audio.bin
Outputting audio to analogue
如果想要透過HDMI介面播放測試音效,可以藉由參數來設定
$ ./hello_audio.bin 1
Outputting audio to hdmi
5. 參考來源
https://www.raspberrypi.org/documentation/usage/demos/README.md
https://www.raspberrypi.org/documentation/usage/demos/hello-audio.md
2016年4月14日 星期四
debugfs usage - SD card
1. To check SD speed mode by debugfs. It needs to enable the "Debug Fiflesystem" from menuconfig and then re-build kernel.
$ make linux-menuconfig

Kernel hacking  --->
  [*] Debug Filesystem
2. If the SPI mode is correct, the messages will be shown like below "5 (sd uhs DDR50)".
$ mount -t debugfs debug /mnt

$ cat /mnt/mmc0/ios
clock:          50000000 Hz
vdd:            15 (2.7 ~ 2.8 V)
bus mode:       2 (push-pull)
chip select:    0 (don't care)
power mode:     2 (on)
bus width:      2 (4 bits)
timing spec:    5 (sd uhs DDR50)
Linux tcpdump 命令
1. tcpdump參數說明
Usage: tcpdump [-aAbdDefIKlLnNOpqRStuUvxX] [ -B size ] [ -c count ]
                [ -C file_size ] [ -E algo:secret ] [ -F file ] [ -G seconds ]
                [ -i interface ] [ -M secret ] [ -r file ]
                [ -s snaplen ] [ -T type ] [ -w file ] [ -W filecount ]
                [ -y datalinktype ] [ -z command ] [ -Z user ]
                [ expression ]

-n: 不把網路位址轉換成DNS名字
-i: 監控封包的網路介面
-w: 將監控封包儲存成檔案
2. 監控網路介面 br0
$ tcpdump -n -i br0 -w a.cap &3. 監控網路介面 eth0
$ tcpdump -i eth0 -w a.cap4. 監控網路介面 eth0,分割每個儲存的封包(size 1500bytes)
$ tcpdump -i eth0 -s 1500 -w a.cap5. 顯示截取內容
$ tcpdump -r a.cap
Linux VLAN 命令
1. VLAN命令參數
Usage: vconfig COMMAND [OPTIONS]

Create and remove virtual ethernet devices

        add             [interface-name] [vlan_id]
        rem             [vlan-name]
        set_flag        [interface-name] [flag-num] [0 | 1]
        set_egress_map  [vlan-name] [skb_priority] [vlan_qos]
        set_ingress_map [vlan-name] [skb_priority] [vlan_qos]
        set_name_type   [name-type]
2. Create VLAN interface
$ vconfig add eth1 100
Added VLAN with VID == 100 to IF -:eth1:-
3. Remove VLAN interface
$ vconfig rem eth1.100
公司網路設定 - 內外網域共存
1. 有兩個網域,192.168.3.0為外網和10.194.0.0為內網,為了讓兩個共存需要修改routing table. 修改routing table,將192.168.0.0的網域提高priority。
$ route change 0.0.0.0 mask 0.0.0.0 192.168.3.1 if 11 metric 10
$ route change 0.0.0.0 mask 0.0.0.0 10.194.26.1 if 12 metric 30
2. 增加一條routing rule給DNS Server到172.18.0.0網域,走10.194.26.1的介面
$ route -p add 172.18.0.0 mask 255.255.0.0 10.194.26.13. 將DNS的mapping直接加入table,所以不需要DNS query
C:\WINDOWS\system32\drivers\etc\host
2016年4月13日 星期三
iptables - port forwarding
PACKET IN
    |
PREROUTING--[routing]-->--FORWARD-->--POSTROUTING-->--OUT
 - nat (dst)   |           - filter      - nat (src)
               |                            |
               |                            |
              INPUT                       OUTPUT
              - filter                    - nat (dst)
               |                          - filter
               |                            |
               `----->-----[app]----->------'


The filter table has three built-in chains:
Forward chain: Filters packets destined for networks protected by the firewall.
Input chain: Filters packets destined for the firewall.
Output chain: Filters packets originating from the firewall.


The nat table has the following built-in chains:
Pre-routing chain: NATs packets when the destination address of the packet needs to be changed.
Post-routing chain: NATs packets when the source address of the packet needs to be changed.
Output chain: NATs packets originating from the firewall.
1. One to One port mapping
$ iptables -t nat -A PREROUTING -i eth1 -p udp --dport 1000 -j DNAT --to 192.168.1.10
$ iptables -t filter -A FORWARD -i eth1 -p udp -d 192.168.1.10 --dport 1000 -j ACCEPT

1000 -> 1000

$ iptables -t nat -A PREROUTING -i eth1 -p udp --dport 1000 -j DNAT --to 192.168.1.10:3000
$ iptables -t filter -A FORWARD -i eth1 -p udp -d 192.168.1.10 --dport 3000 -j ACCEPT

1000 -> 3000
2. Many to One port range mapping
$ iptables -t nat -A PREROUTING -i eth1 -p udp --dport 1000:2000 -j DNAT --to 192.168.1.10:3000
$ iptables -t filter -A FORWARD -i eth1 -p udp -d 192.168.1.10 --dport 3000 -j ACCEPT

1000 -> 3000
1001 -> 3000
...
1999 -> 3000
2000 -> 3000
3. One to One port range mapping
$ iptables -t nat -A PREROUTING -i eth1 -p udp --dport 1000:2000 -j DNAT --to 192.168.1.10
$ iptables -t filter -A FORWARD -i eth1 -p udp -d 192.168.1.10 --dport 1000:2000 -j ACCEPT

1000 -> 1000
1001 -> 1001
...
1999 -> 1999
2000 -> 2000
4. One to One port shift mapping
$ iptables -t nat -A PREROUTING -i eth1 -p udp --dport 1000:2000 -j DNAT --to 192.168.1.10:3000-4000
$ iptables -t filter -A FORWARD -i eth1 -p udp -d 192.168.1.10 --dport 3000:4000 -j ACCEPT

1000 -> 3000
1001 -> 3000
...
1999 -> 3000
2000 -> 3000
Linux 壓縮命令整理
1 .tar
GNU / Linux 各種壓縮與解壓縮指令
- tar
$ tar -cvf File.tar Dir

- untar
$ tar -xvf File.tar


-c, --create            create a new archive
-x, --extract, --get    extract files from an archive
-v, --verbose           verbosely list files processed
-f, --file=ARCHIVE      use archive file or device ARCHIVE
2. .tar.gz
- tar
$ tar -zcvf File.tar.gz Dir

- untar
$ tar -zxvf File.tar.gz


-z, --gzip,             filter the archive through gzip
    --gunzip,
    --ungzip
-c, --create            create a new archive
-x, --extract, --get    extract files from an archive
-v, --verbose           verbosely list files processed
-f, --file=ARCHIVE      use archive file or device ARCHIVE
3 .tar.bz2
- tar
$ tar -jcvf File.tar.bz2 Dir

- untar
$ tar -jxvf File.tar.bz2


-j, --bzip2             filter the archive through bzip2
-c, --create            create a new archive
-x, --extract, --get    extract files from an archive
-v, --verbose           verbosely list files processed
-f, --file=ARCHIVE      use archive file or device ARCHIVE
4 .tar.xz
- tar
$ tar -Jcvf File.tar.xz Dir

- untar
$ tar -Jxvf File.tar.xz


-J, --xz                filter the archive through xz
    --lzip              filter the archive through lzip
    --lzma              filter the archive through xz
    --lzop
-c, --create            create a new archive
-x, --extract, --get    extract files from an archive
-v, --verbose           verbosely list files processed
-f, --file=ARCHIVE      use archive file or device ARCHIVE
5. 參考來源GNU / Linux 各種壓縮與解壓縮指令
Linux kernel - printk level使用說明
1. Printk level說明
http://elinux.org/Debugging_by_printing
#define KERN_EMERG      "<0>"   /* system is unusable                   */
#define KERN_ALERT      "<1>"   /* action must be taken immediately     */
#define KERN_CRIT       "<2>"   /* critical conditions                  */
#define KERN_ERR        "<3>"   /* error conditions                     */
#define KERN_WARNING    "<4>"   /* warning conditions                   */
#define KERN_NOTICE     "<5>"   /* normal but significant condition     */
#define KERN_INFO       "<6>"   /* informational                        */
#define KERN_DEBUG      "<7>"   /* debug-level messages                 */
2. 修改printk level範例
$ echo 7 4 1 7 > /proc/sys/kernel/printk3. 參數說明
3.1. console_loglevel
Messages with a higher priority than console_loglevel will be printed to the console.

3.2. default_message_level
Messages without an explicit priority will be printed with priority default_message_level.

3.3. Minimum_console_loglevel
minimum_console_loglevel is the minimum (highest) value to which console_loglevel can be set.

3.4. Default_console_loglevel
Default_console_loglevel is the default value for console_loglevel.
4. 參考來源http://elinux.org/Debugging_by_printing
訂閱:
文章 (Atom)